Manual
1. General information
1.1 Introduction
This user manual has been composed to ensure the safety and entertainment of your DinghyGo Inflatable 3-in-1 sailing boat. This manual contains detailed information on the watercraft, its equipment, its systems and information on its use and maintenance. Please read this manual and review the DinghyGo instruction videos with care; it is important that you are familiar with the watercraft before use.
This user manual does not offer a course in safety and good seamanship. If this is your first experience with a watercraft, or if you are not familiar with this particular type of watercraft, please make sure you ensure your own safety and comfort by gaining experience in both steering and using a watercraft (sailing and motor boat) before using your DinghyGo watercraft.
Your DinghyGo supplier, national sailing federation or yacht club will be on hand to offer advice on local sailing schools and sailing clubs with qualified instructors. Make sure your DinghyGo is suitable for the anticipated wind and sea conditions, and that you and your crew are able to manage the boat in these conditions.
This owner’s manual does not provide a detailed guide for maintenance or repairs of the boat.
If problems occur, please consult your DinghyGo supplier. Follow the maintenance and repair instructions provided in this manual for proper maintenance and repair of your DinghyGo. Always consult trained and competent specialists for maintenance, repairs or alterations. Changes that are made to the boat that may affect the safety of the watercraft may be assessed, executed and documented by competent people only. Your supplier, Aquacrafts B.V., cannot be held responsible for modifications that were not approved by them. In some countries, a licence or permit is required to operate this watercraft, and sometimes specific rules apply. Always make sure your watercraft is well maintained and please take into account that wear and tear will occur over time, especially due to heavy use or misuse of the watercraft. Every boat is made to be robust, but your boat can be seriously damaged if used incorrectly. Always adjust the speed and direction of the boat according to your surroundings. The crew must be familiar with the use of all safety and emergency procedures (man overboard, towing, etc.). Sailing schools and clubs regularly organize training sessions to help you if necessary.
In some countries, wearing a life jacket or buoyancy aid that meets the national regulations is obligatory at all times.
This manual uses the following safety symbols:
WARNING
Indicates a potentially hazardous situation that could result in injury or death if not avoided.
DANGER
Indicates an imminent hazardous situation that could result in injury or death if not avoided.
CAUTION
Indicates a potentially hazardous situation that could result in minor or moderate injury or property damage if not avoided. May also warn against unsafe practices.
Please keep this manual in a safe place and pass it to the new owner if you choose to resell your DinghyGo.
1.2 CE Category
Your DinghyGo is meant to be used as a Category D watercraft:
Category D. A watercraft designed for use in wind up to, and including, Force 4 on the Beaufort Scale, and the corresponding significant wave height up to, and including, 0,3 meters, with occasional waves of 0,5 m maximum height. Such conditions are found in sheltered coastal and inland waters, including small bays, small lakes, rivers and canals in good weather conditions.
☝︎ The wave height is the average height of the highest one third of the waves, which approximately corresponds to the wave height as estimated by an experienced observer. Some waves, however, can be twice as high.
WARNING
Take proper precautions if the watercraft is used from a mothership on the open sea. Never lose touch with the mothership!
Always wear a life jacket!
1.3 ABYC Standard
Your DinghyGo complies to the American Boat & Yacht Council (ABYC) H-28 Type 1 Inflatable Boats standard.
1.4 Builder's plate (capacity label)
The builders’ plate including information from DinghyGo producer Aquacrafts B.V. is located on the inside of the boat’s transom.
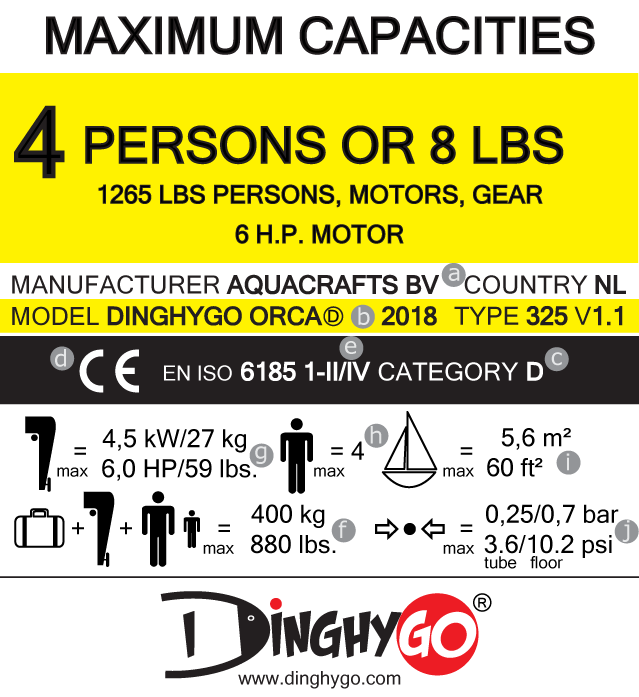
Representation of the Builder’s Plate (Orca 325)
Explanation of the Builder’s Plate:
a. Manufacturer’s name b. Boat model, type and version c. Boat category - see Table 2.1 d. CE marking e. ISO 6185 part & type f. Maximum load (people + outboard motor + fuel + equipment) g. Maximum power and outboard motor weight h. Maximum capacity / number of persons i. Maximum sail area j. Maximum pressure of the air chambers and floor
1.5 National regulations
Before preparation, check local regulations to see if there are restrictions for the water you want to go on. Be especially cautious of restrictions with regard to sail, speed, the use of the sail kit or outboard motor, noise restrictions on the water, etc.
1.6 General safety information
☝︎ Advice for safe sailing
In order to safely enjoy the waterways, you should be familiar with local and other governmental boating regulations and restrictions. Please consider the following suggestions:
- Use life jackets or buoyancy aids. Make sure that a suitable life jacket or buoyancy aid is available for each person on board which are easily accessible (mandatory by law in some countries).
- Do not exceed the maximum rated load. If in doubt, contact your DinghyGo supplier.
- Perform safety checks and required maintenance. Follow a regular schedule and ensure that all repairs are done properly.
- Make sure you know all applicable nautical rules and laws and follow them.
☝︎ Make sure everyone in the boat is properly seated. Do not sit on any part of the boat or sailing rig that was not intended for seating.
This includes the transom edges, the bow and the deck, where sudden unexpected acceleration might take one off balance. Sudden stopping, unexpected loss of control over the boat or sailing rig, and sudden boat movement could cause a person to be thrown overboard or into the boat.
☝︎ Make sure you are NEVER under the influence of alcohol or drugs while boating (mandatory by law). Alcohol and drug use have an adverse effect on your judgment and greatly reduce your ability to react on the water.
When possible, prepare others on the boat in case the operator is incapacitated or falls overboard: instruct at least one other person in the basics of sailing, starting and operating the outboard motor, and steering the boat.
☝︎ Stop the outboard motor whenever passengers are boarding, unloading, or are located on the back of the boat. Simply switching the outboard motor to neutral is not safe enough.
Pay attention. The operator of the boat is responsible by law to properly watch and listen. The operator must have an unobstructed view, particularly to the front. The passengers and load must not obstruct the operator's view when the boat is moving.
☝︎ Never steer your boat directly behind a water-skier (or wake-boarder), as they might fall. If the water skier is travelling 61 m (200 ft.) in front of you and your boat is travelling at a speed of 20 km / h (12.5 mph) it will only take you ten seconds to overtake him.
Be aware of falling water skiers. The operator must always be able to see the fallen skier and must never back up to the skier or anyone in the water. Report all accidents.
2. Specifications, description and functions
2.1 Specifications
The DinghyGo models fall under the protection of the recreational Craft Directive 2013/53/EU. An example of a statement of compliancy has been added as an Appendix to this manual.
| DinghyGo model specifications | |||
|---|---|---|---|
| model | Orca 280 | Orca 325 | Orca 375 |
| Boat specifications | |||
| CE category | D | D | D |
| Number of air chambers | 3 | 3 | 3 |
| Dimensions and weight' | |||
| length (ft/cm) | 9’2”/280 | 10’7”/325 | 12’3”/375 |
| width (ft/cm) | 4’9”/150 | 4’9”/150 | 4’9”/150 |
| draft (ft/cm) | 2’8”/85 | 2’8”/85 | 2’8”/85 |
| tube diameter (in/cm) | 16”/40 | 16”/40 | 16”/40 |
| weight (lbs/Kg) | 60/27 | 64/29 | 71/32 |
| Capacity (maximum) | |||
| persons (without/with sail rig) | 3/2 | 4/2.5 | 5/3 |
| payload (lbs/Kg) | 660/300 | 880/400 | 1,100/500 |
| outboard engine (kW/Hp) | 4.5/6.0 | 4.5/6.0 | 4.5/6.0 |
| pressure tubes/floor (psi) | 3.6/10.2 | 3.6/10.2 | 3.6/10.2 |
| Packing size" (LxWxH in) | 40”x21”x13” | 40”x28”x13” | 40”x28”x15” |
| Packing size" (LxWxH cm) | 100x54x32 | 100x72x32 | 100x72x38 |
| Sail/row-kit specifications | |||
| Dimensions and weight' | |||
| mast length (ft/cm) | 14’1”/430 | 14’1”/430 | 14’1”/430 |
| boom length (ft/cm) | 7’4”/225 | 7’4”/225 | 7’4”/225 |
| sail area (sq.ft/m2) | 52/4.8 | 60/5.6 | 64/5.9 |
| weight (lbs/Kg) | 32/14 | 33/15 | 37/17 |
| Packing size" (LxWxH in) | 47”x18”x7” | 47”x18”x7” | 47”x18”x8” |
| Packing size" (LxWxH cm) | 120x45x17 | 120x45x18 | 120x45x20 |
| *) Specifications can differ by 5% | |||
| **) Weights and packing sizes excluding carton, packing materials & bag. |
Model specifications table
2.2 Model
DinghyGo is an inflatable three-in-one sailboat that acquires its shape, strength and buoyancy by being filled with air. The boat is designed for small voyages in sheltered and open waters, as indicated in section “CE Category”. The different DinghyGo models are specified in the Model specifications table.
2.3 Capacity
WARNING
Do not exceed the maximum number of people. Regardless of the number of persons aboard, the total weight of persons and equipment must never exceed the maximum recommended load. Always use the seat / seating.
2.4 Deadweight tonnage
WARNING
When loading the watercraft, never exceed the maximum recommended load. Always use caution when loading the watercraft and distribute loads appropriately to maintain proper buoyancy. Avoid placing heavy weight in high places.
The maximum recommended load strictly includes:
a. The number of persons 75 kg each. If children are taken as crew, then the maximum number of people may be increased provided that the weight of each child is not more than 37.5 kg and the total weight is not exceeded; b. Basic equipment including sail kit and rowing parts; c. Stock and load (if any), dry facilities, consumable liquids [not covered in d.] and a variety of equipment which is not a part of the weight of the boat or mentioned in b., including outboard motor; d. Useful liquids (fresh water, fuel) filled to its maximum capacity in portable tanks.
2.5 Sail kit
The maximum sail area of the sailing rig (sail kit) is shown in the "model specification table" and on the capacity information notice.
The installation and use of the sail kit are described in the chapters called "Assembly and disassembly”, “Recommendations for safety and use" and Appendix “Assembly Rudder/Orca boom …” in this manual.
WARNING
Using a sail kit that is too big or unoriginal can severely damage the watercraft or cause personal injury, especially when there is too much wind. Always use the original and matching DinghyGo sail kit, which is less than or equal to the specified maximum sail area. Never sail with more wind than the specified maximum wind speed in the section “CE Category”
2.6 Outboard motor
The maximum power of this boat is shown in the "model specification table" and on the capacity information notice.
The installation of the outboard motor and further operating instructions are described in the chapter called "Assembly and disassembly" in this manual.
DANGER
Using an onboard motor at maximum power setting can result in serious injury, death or damage to the watercraft.
DANGER
You could lose control of the boat when using the onboard motor at full speed. Accidents may occur. The supplier (Aquacrafts B.V.) cannot be held responsible for these actions.
WARNING
Be careful when refueling, i.e. don’t smoke and clear up all spilt fuel. Be careful when installing the outboard motor to prevent damage to the fuel hose. Make sure no combustible materials can come into contact with engine parts.
2.7 Visual representations
2.7.1 Orca 280 — Side view
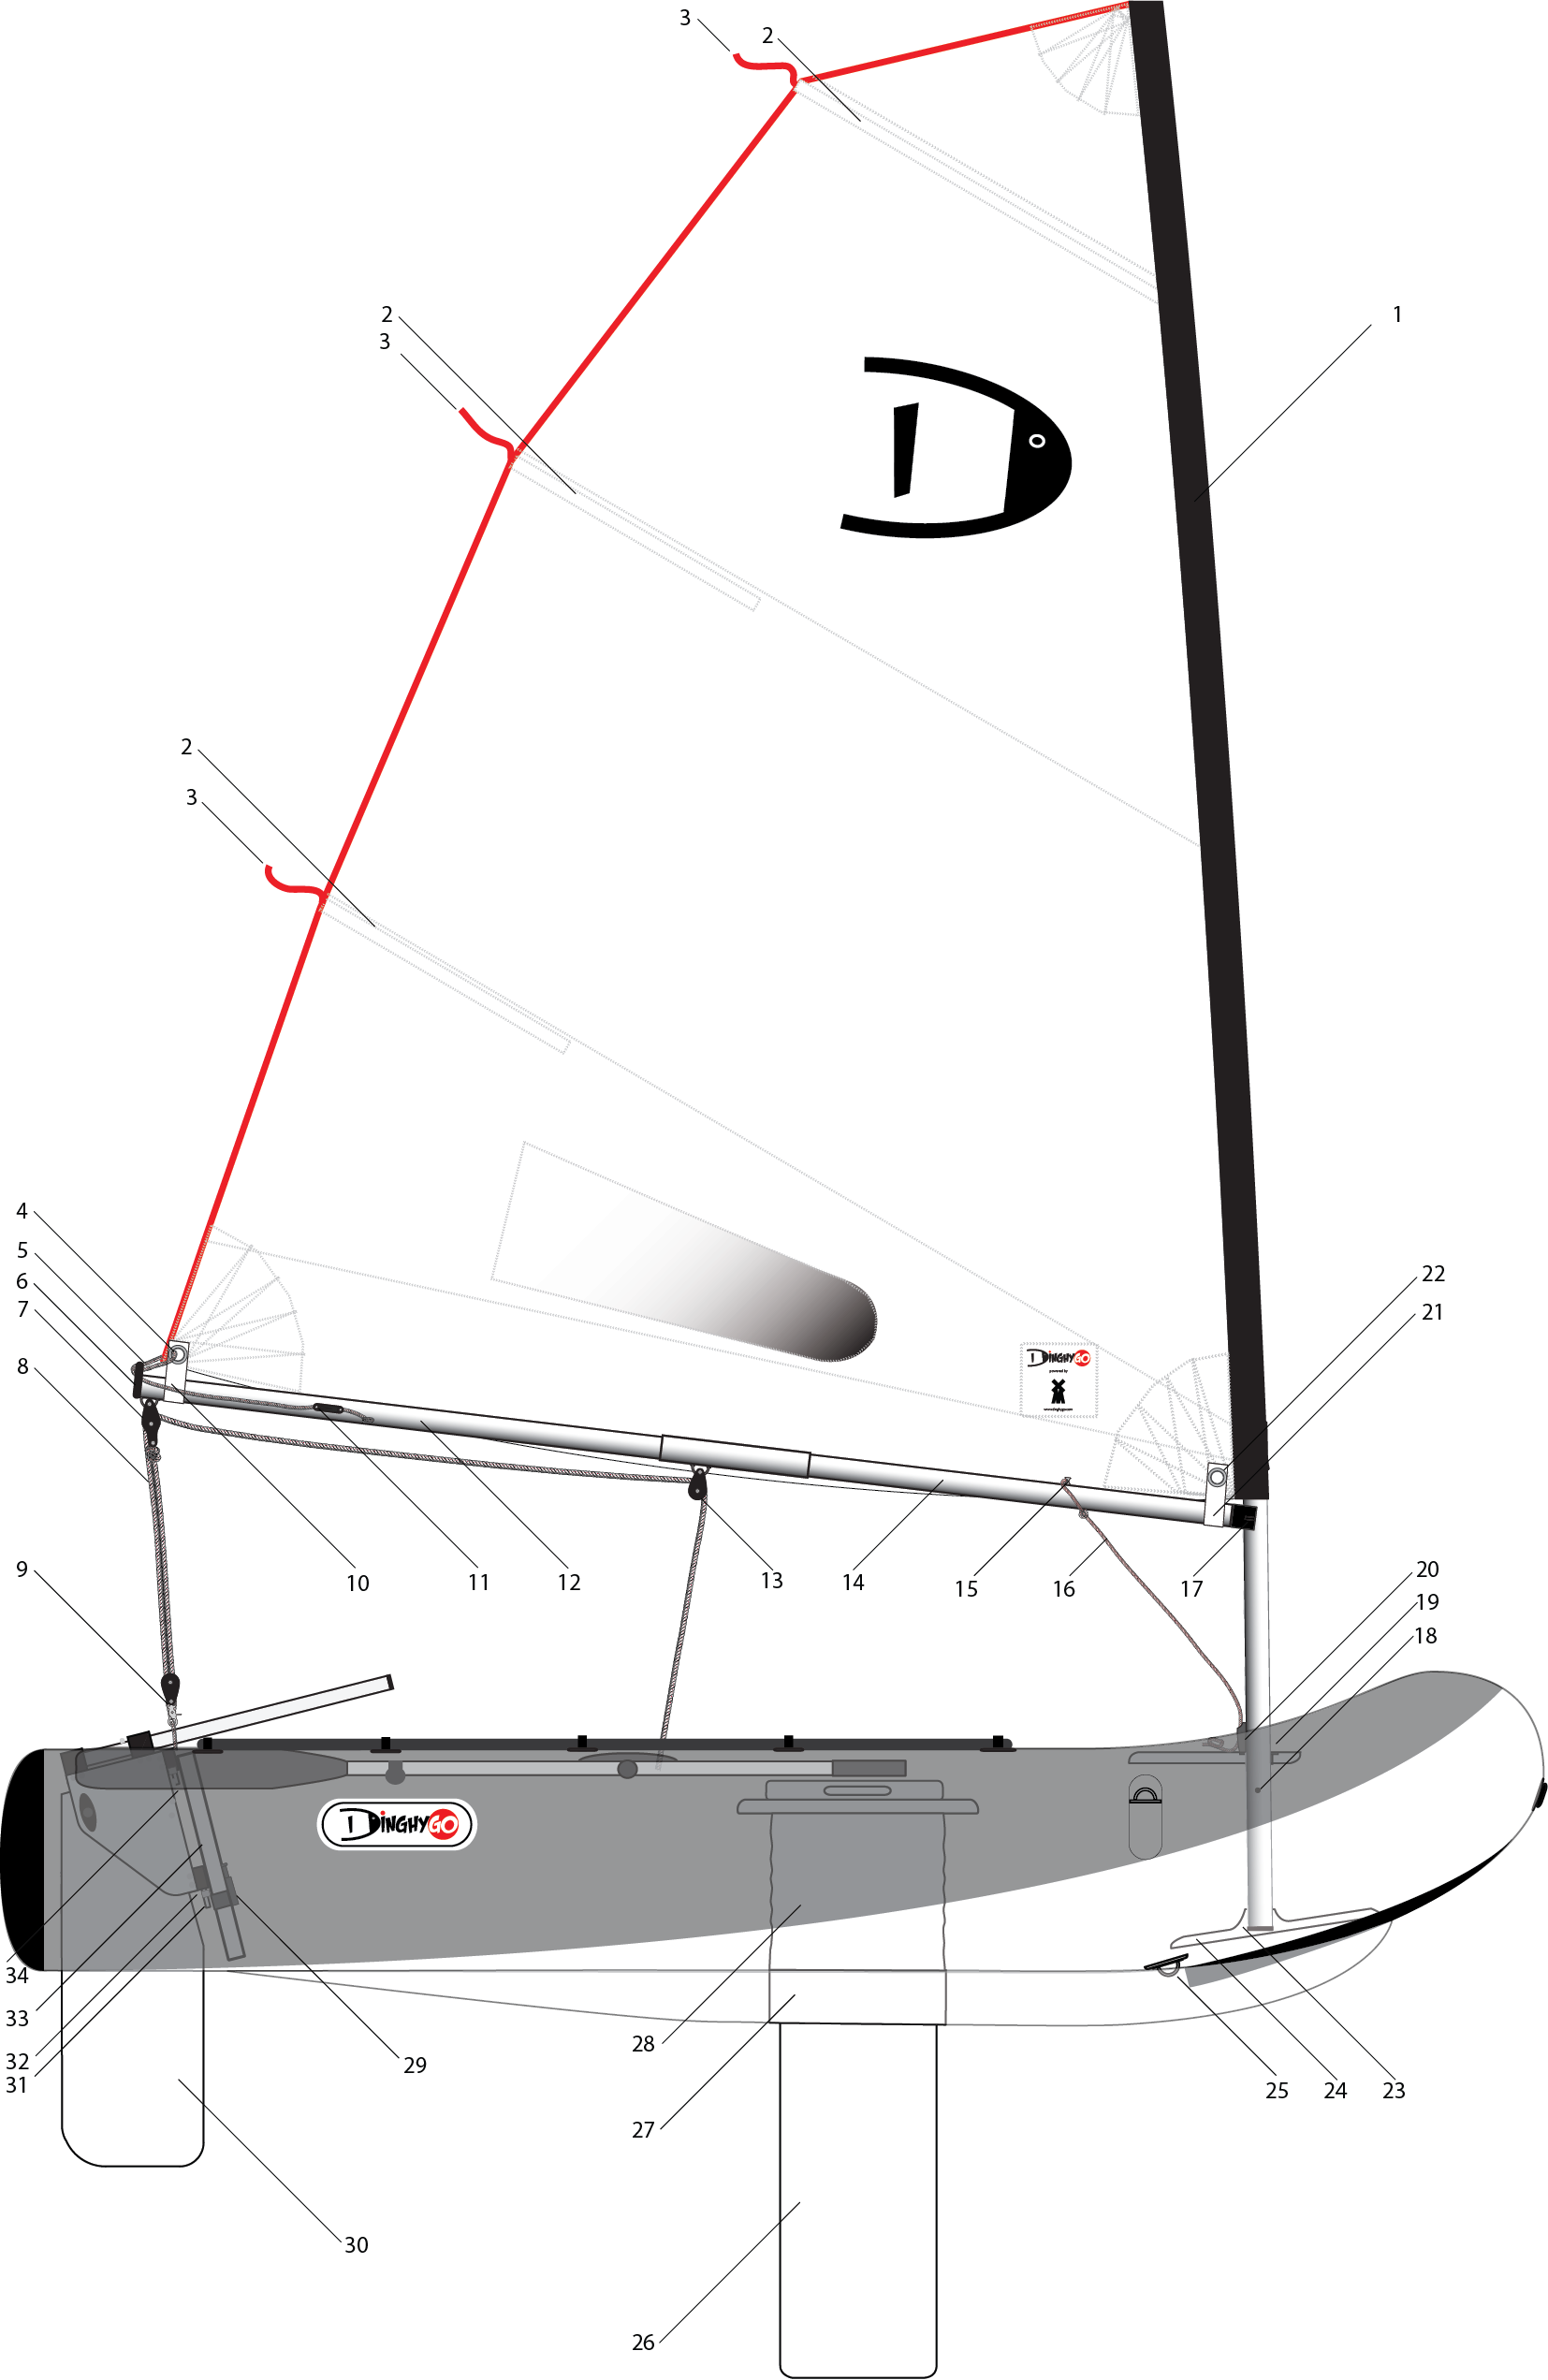
Orca 280 — Sideway view
Legenda
| No. | Item | No. | Item |
|---|---|---|---|
| 1 | Mast sleeve | 18 | Mast lock system |
| 2 | Sail batten | 19 | Deck board |
| 3 | Telltale | 20 | Mast clamcleat |
| 4 | Clew | 21 | Velcro strap |
| 5 | Outhaul | 22 | Tack |
| 6 | Boom outboard end | 23 | Maststep |
| 7 | Mainsheet block with becket | 24 | Maststep board |
| 8 | Mainsheet | 25 | D-ring |
| 9 | Mainsheet block with snap shackle | 26 | Daggerboard |
| 10 | Velcro strap | 27 | Socket |
| 11 | Boom clamcleat | 28 | |
| 12 | Boom rear section | 29 | Drain plug |
| 13 | Mainsheet block | 30 | Rudder |
| 14 | Boom front section | 31 | Rudder pintle |
| 15 | Pinstop downhaul | 32 | Rudder gudgeon |
| 16 | Downhaul | 33 | Transom |
| 17 | Boom inboard end | 34 | Rudder retaining clip |
2.7.2 Orca 375 — Side view
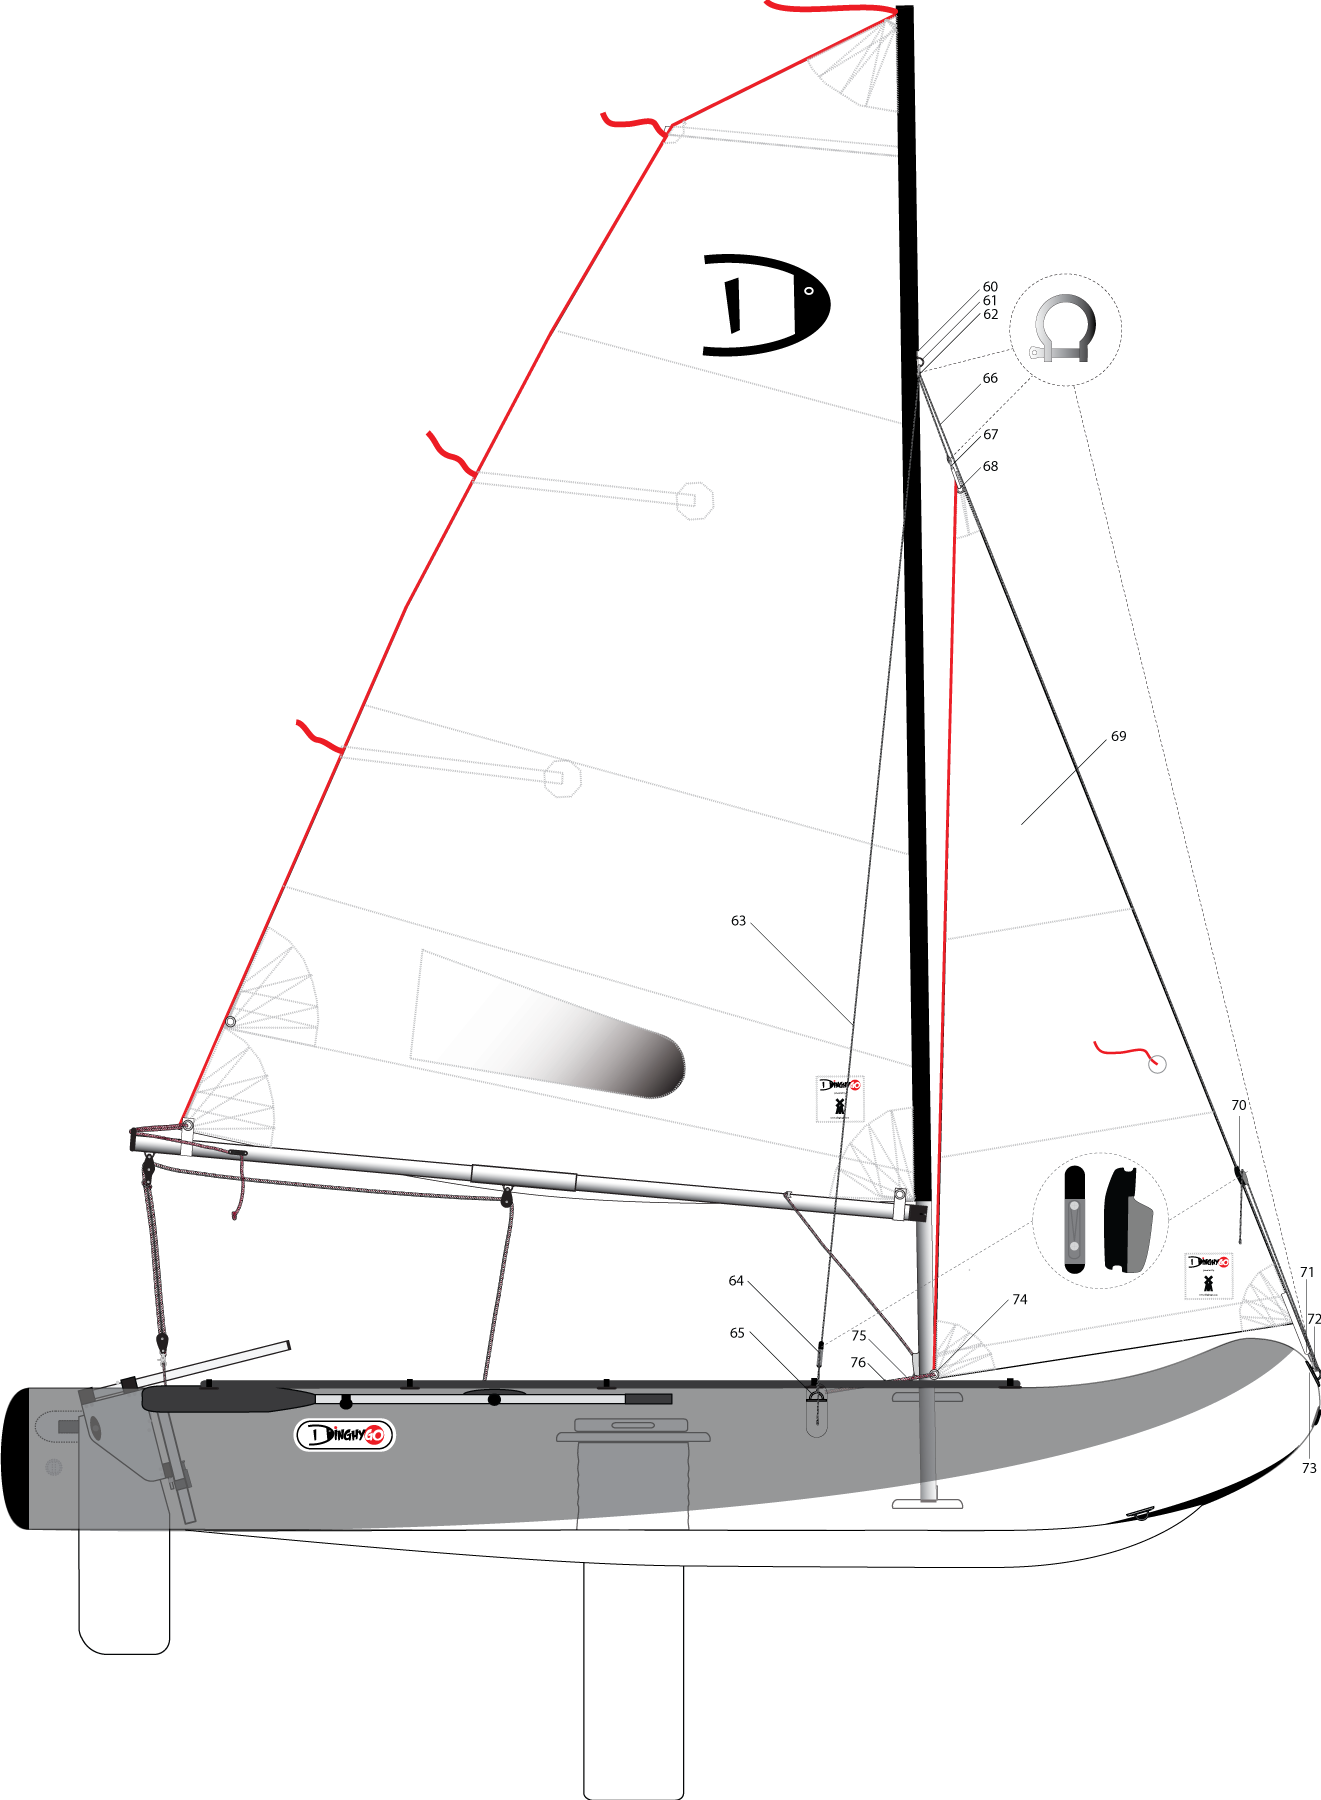
Orca 375 — Sideway view
Legenda — Additional items (shrouds & mast support)
| No. | Item | No. | Item |
|---|---|---|---|
| 60 | Mast sleeve opening | 63 | Shroud |
| 61 | Mast eyelet | 64 | Shroud cleat |
| 62 | Shroud shackle | 65 | Shroud/davits D-Ring |
Legenda — Additional items (jib)
| No. | Item | No. | Item |
|---|---|---|---|
| 66 | Halyard | 72 | Jib shackle (clew) |
| 67 | Halyard shackle | 73 | Bow D-ring |
| 68 | Jib head | 74 | Jib clew |
| 69 | Jib | 75 | Jib sheet |
| 70 | Halyard cleat | 76 | Jib sheet D-ring |
| 71 | Jib tack |
2.7.3 Orca 280 — Top view
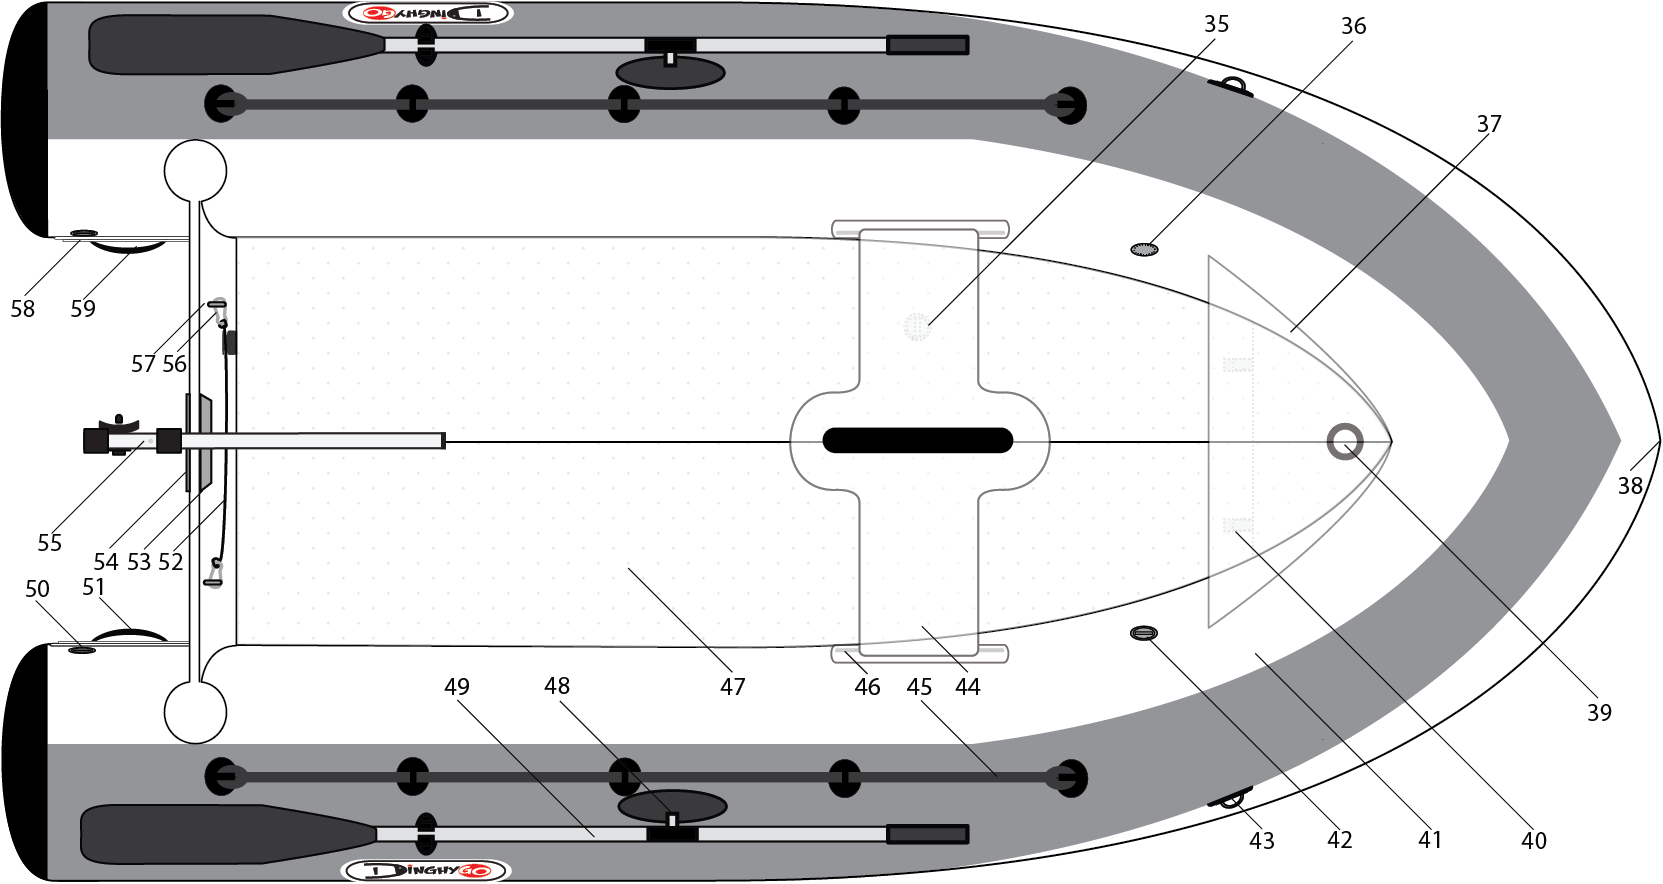
Orca 280 — Top view
Legenda
| No. | Item | No. | Item |
|---|---|---|---|
| 35 | Valve floor (no. 4) | 48 | Oar lock |
| 36 | Valve (no. 1) | 49 | Oar |
| 37 | Deck board | 50 | Valve (no. 3) |
| 38 | Handle bow | 51 | Handle (rear) |
| 39 | Mast collar | 52 | Bridle |
| 40 | Maststepboard stopper | 53 | Transom motorpad |
| 41 | Over pressure valve | 54 | Transom motorplate |
| 42 | Davits eye | 55 | Tiller |
| 43 | Over pressure valve floor | 56 | Carabine hook |
| 44 | Seat/daggerboard holder | 57 | Davits- and bridle eye |
| 45 | Rope | 58 | Valve (no. 2) |
| 46 | Seat tendon | 59 | Handle (rear)board |
| 47 | 3D floor |
2.7.4 Kick-up rudder — Side/rear view
Kick-up rudder — Sideway view (left) and rear view (right)
Legenda
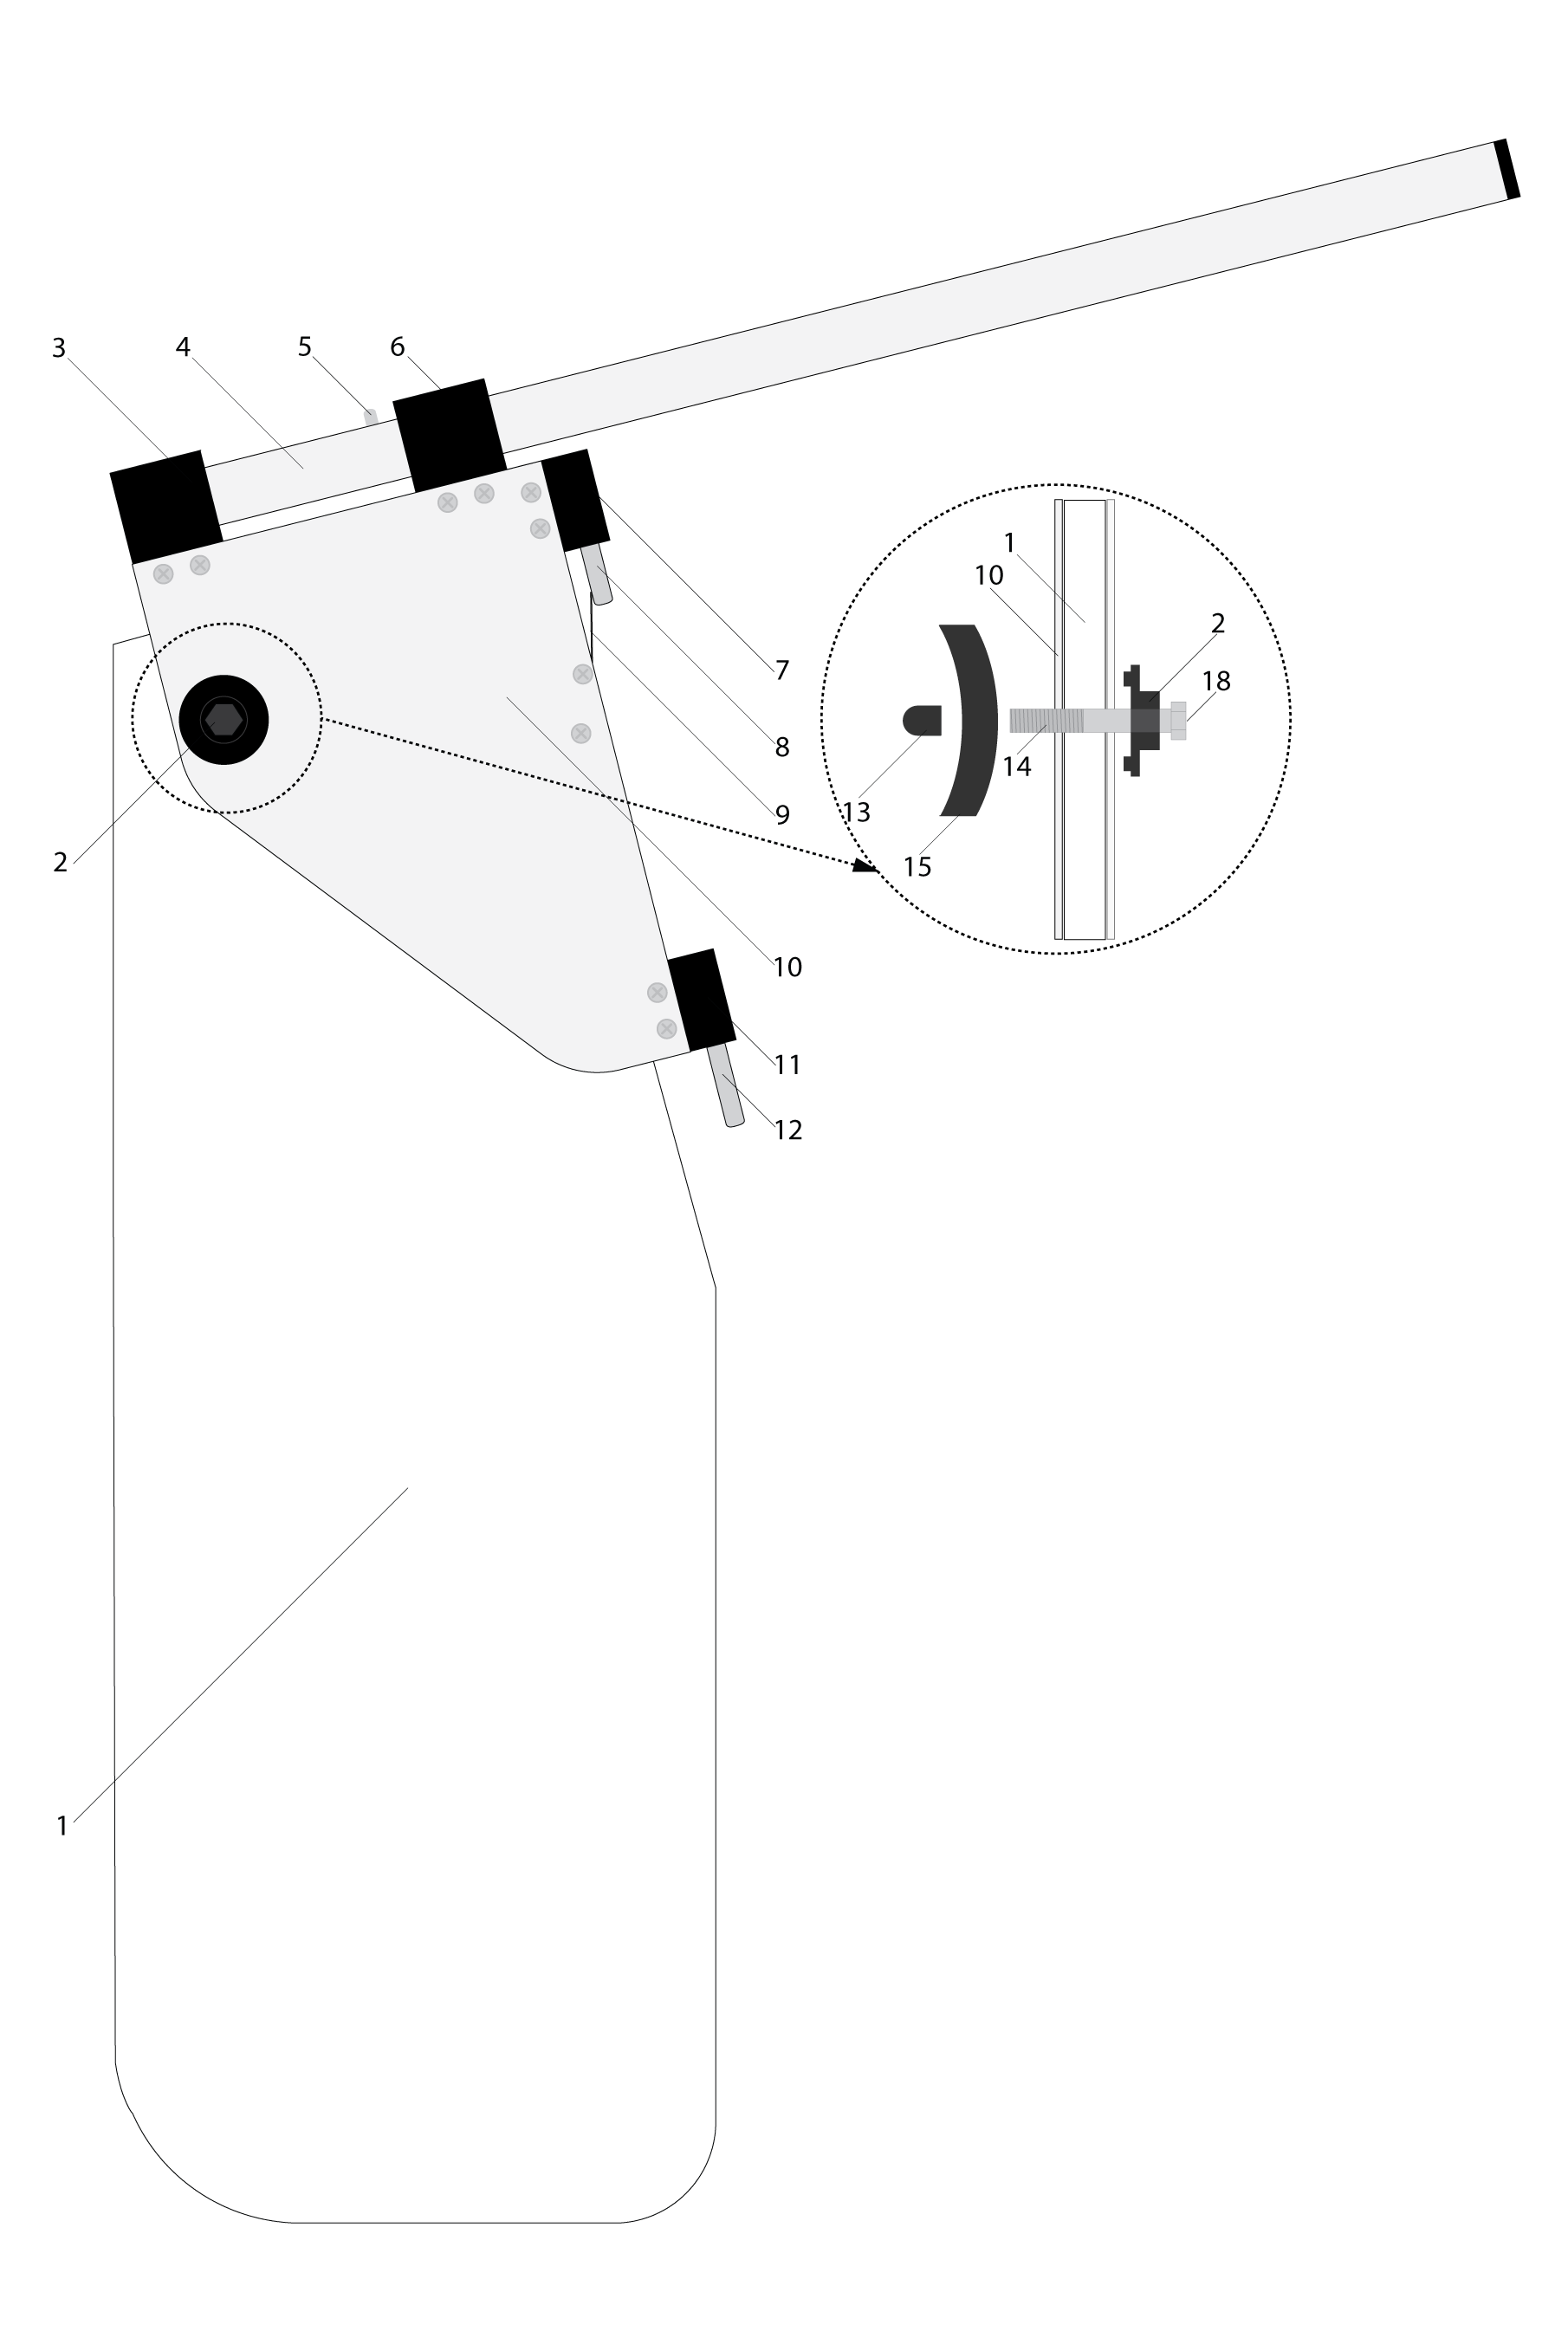
| No. | Item | No. | Item |
|---|---|---|---|
| 1 | Rudder blade | 11 | Pintle holder (bottom) |
| 2 | Bolt retainer | 12 | Pintle |
| 3 | Tiller holder (end) | 13 | Bolt cap |
| 4 | Tiller | 14 | Bolt |
| 5 | Tiller spring lock | 15 | Wing nut |
| 6 | Tiller holder (front) | 18 | Bolt head |
| 7 | Pintle holder (top) | 20 | Bolt head |
| 8 | Pintle | ||
| 9 | Retaining clip | ||
| 10 | Rudderhead |
3. Assembly and disassembly
☝︎ Look closely at the DinghyGo instructional videos on assembling and disassembling the watercraft. You will receive these instruction videos with your DinghyGo. You can also order these from your DinghyGo supplier.
3.1 Inflatable floor
The DinghyGo boats are equipped with an inflatable floor that needs to be filled properly. Using the boat without a properly inflated bottom is unsafe, uncomfortable and can lead to damage to the boat. Look at the section called "inflating the inflatable floor" to learn how to fill the inflatable floor.
3.2 Valves
The boat valves are designed especially for safe and comfortable use. The flat valves are designed to increase the comfort in the boat and to prevent damage to the boat.
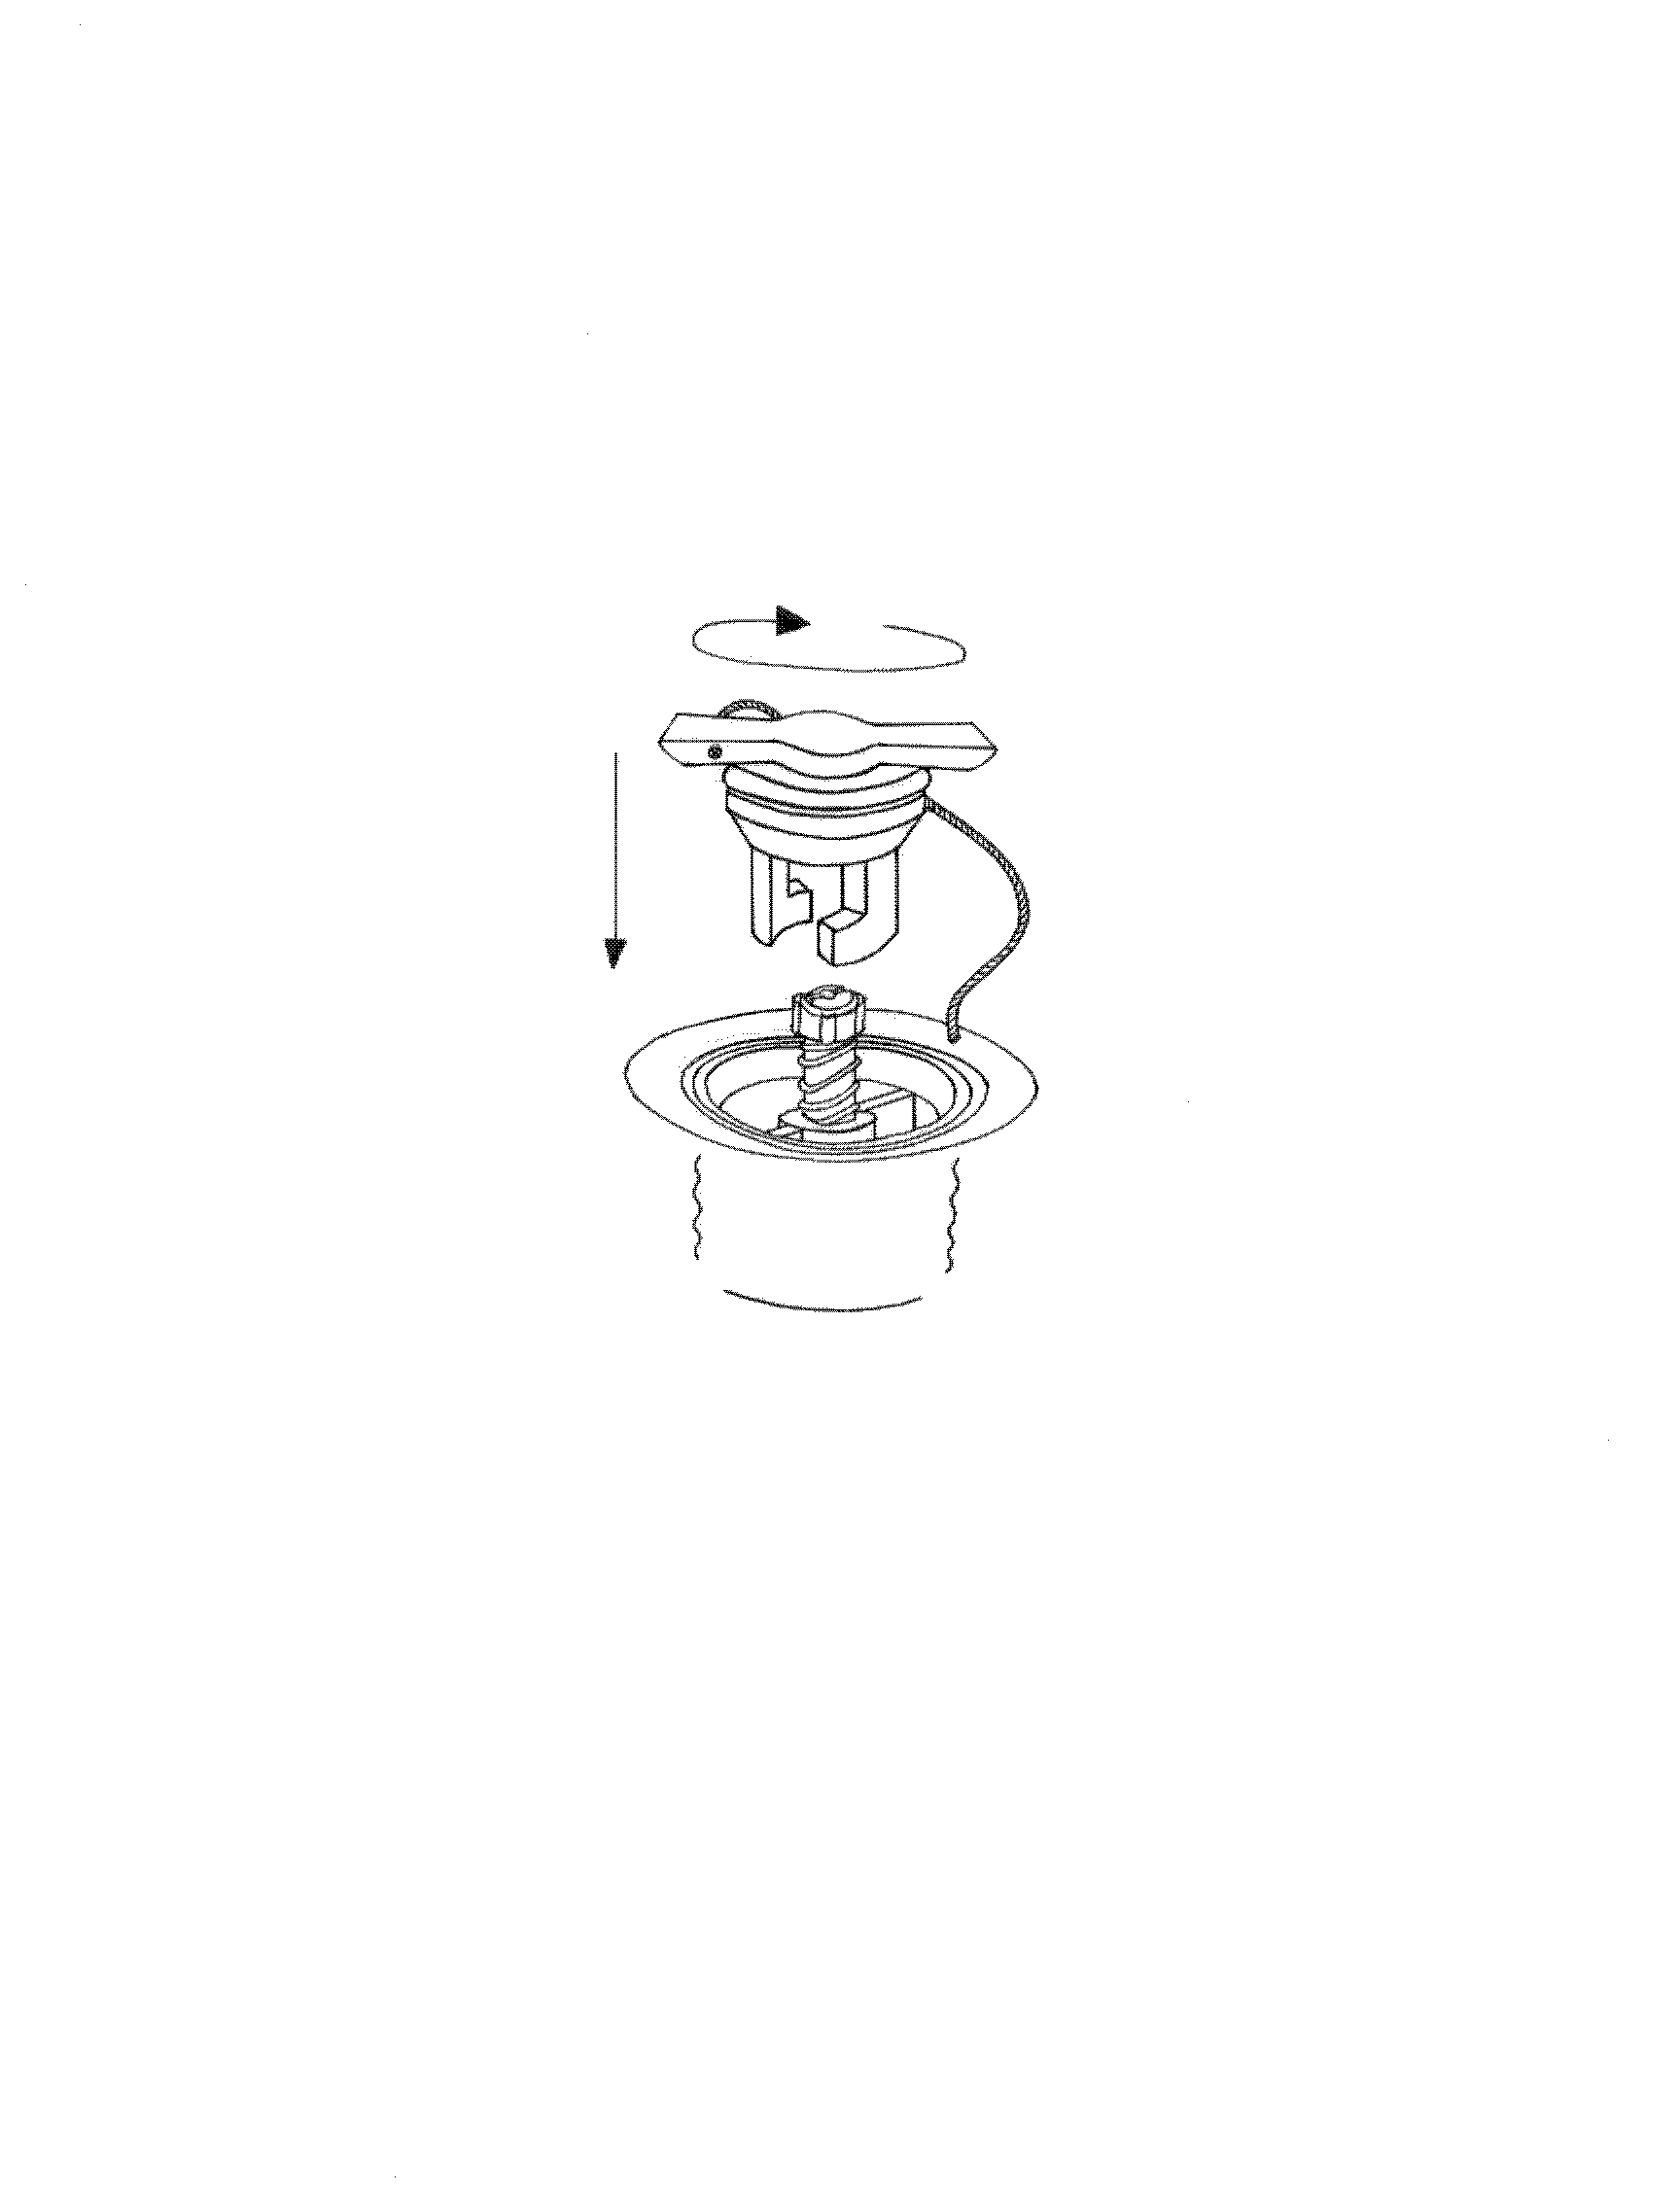
Image of a valve
3.2.1 Using the valves
- Remove the outer cap. The valve is closed when the middle screw knob is on top.
- To open the valve put your finger on the centre of the valve and press down the centre screw button. Turn your finger ¼ clockwise until the knob locks.
- To close the valve, press the knob and turn your finger ¼ clockwise until the knob comes up.
3.2.2 Pump connections
- Attach the nozzle of the pump (the tip part) to the valve.
- Turn it to the right (clockwise) until it locates, and start pumping.
- Keep pumping until the boat is completely full.
- Unplug the pump when finished.
- Make sure the cap is put back on (to protect against dirt and damage).
3.2.3 Checking for leaks
If air escapes:
- Take the valve key out of the repair kit.
- Insert the key into the valve and turn the key clockwise. Check if the problem is resolved.
- When a leak is discovered, contact your DinghyGo supplier and check the warranty.
- Take the back of the valve into your hands and turn the stem to the left with the key (counter clockwise) and remove the stem.
- Inspect the valve for damage.
- If there is any damage (see appendix "Warranty"), take the defective valve to your DinghyGo supplier. You will receive a new valve within the warranty period.
- Lubricate the stem with silicone or soapy water and reinstall it.
3.3 Rowing kit
There are two oars supplied with the boat. The blades can be removed from the shafts to facilitate transportation. The oars should be placed correctly in the oarlocks. Hold the oar parallel to the tube with the blade facing forward and insert the pin as deep as possible in the oarlock. Then turn the oar outward 180 degrees to secure it in the oarlock.
3.4 Sail kit
Your DinghyGo is supplied with a sail kit, consisting of:
- Seat (Orca 375 includes 2 jib clams)/ daggerboard case
- Mast step board
- Daggerboard
- Rudder
- Sectional mast
- Sectional boom
- Sail
- Rope Set (sheets, shrouds with cleats, shackle, elastic band daggerboard)
- Sail kit bag
The installation and rigging of the sailing equipment is explained later in the manual including its Appendix.
3.5 Seating
DinghyGo is equipped with a special seat and a "seat cord" on both side tubes, onto which the seat is pushed. The seat also functions as the top slot for the daggerboard (case).
☝︎ You must install the seat before fully inflating the boat.
3.6 Inflating the tubes
Roll out the boat onto the ground to fill it up with air. Remove any sharp objects from the surface on which the boat is inflated.
- After unpacking the boat, check if all the components are present.
- Check that the valves are closed. This is done by putting a finger in the valve, pushing the little grey screw button and turning it slightly to the right.
- If the knob jumps up a little, you can proceed to fill the boat with air. (To drain air out of the boat you have to turn the knob to the left!).
- Use the pump that was provided with the boat. Push the nozzle (the tip) against the valve and turn to the right. The pump will lock onto the valve.
- Put enough air in the boat to create the correct shape of the boat.
☝︎ All inflatable chambers must be inflated equally to avoid damage to the bulkheads.
☝︎ Inflating and deflating your boat the right way is essential to the durability of your boat.
3.6.1 Order in which to inflate
Inflate the boat in the ascending order of the numbers that are on the valve tags:
-
Front chamber (no. 1)
-
Side-chambers (no. 2 & 3)
-
Floor (no. 4)
3.6.2 Inflating the hull tubes
Step 1: Pump air into the front chamber using the inflation valve until the specified pressure is reached.
Step 2: Pump air into the two side-chambers in the correct order until the specified pressure is reached.
If inflation is carried out in the correct order, the boat will have the correct pressure and there will not be any deformation of the float sections.
Step 3: Seal all the valves by inserting the valve caps and turning them clockwise.
☝︎ Never exceed the values on the builder's plate and valve tags! Inflate the boat floats to 0.25 bar = 3.6 psi = 25 kPa and the floor to 0.19 bar = 2.75 psi = 19 kPa (tolerance ±20%). Inflate the Orca floor to 0.7 bar = 10.2 psi = 70 kPa.
☝︎ Do not use mechanical compressors to inflate your boat. The included hand pump is adjusted to create the perfect pressure for your boat. If preferred, you could use an electric pump that can be provided as an option by your DinghyGo supplier. Use the correct pressure settings to properly facilitate inflation.
CAUTION
Incorrect inflation can cause structural damage to your watercraft. Take your watercraft out of direct sunlight when outside of the water. Direct sunlight causes the air in the watercraft to expand, causing damage to your watercraft (except through proper use and maintenance of the pressure relief valve).
3.7 Inflating the inflatable floor
If you fully inflate the inflatable floor, it clamps in between the side tubes and the transom.
Step 1: Pump air into the bottom through the valve, like the side tubes, until the specified pressure is reached.
Step 2: Seal the valve by inserting the valve cap and rotating clockwise.
3.8 Assembly and disassembly of the sailing rig
The sail kit bag contains the complete sailing equipment. Lay out all sail components to facilitate installation and rigging.
3.8.1 Installation of the mast step board, seat and bridle
- Partially inflate the bow and side tubes (read the section "inflating the hull tubes”), so that they have some shape but are not fully up to pressure. Do not inflate the floor yet.
- Slide the mast step board in under the tubes until it locates in front of the mast step board stoppers on the floor (at front of boat).
- Slide the seat / daggerboard case onto the seat cords on the tubes, until it is located directly above the daggerboard case opening in the bottom.
- Tie one end of the bridle onto the transom eye and attach the other end to the other transom eye with the carabiner.
3.8.2 Inflation of the boat
- Inflate the hull tubes and floor completely (read the paragraph "inflating the hull tubes" and "inflating the inflatable floor"), in such a way that the mast step board and seat / daggerboard case are firmly clamped.
- Then attach the flexible part of the daggerboard case with the Velcro on the bottom of the seat / daggerboard case.
- Attach the oars (read the paragraph “installation of the oars").
3.8.3 Rigging
- Make sure the rudder and Orca boom are correctly assembled after unboxing in accordance with the Appendix.
- Slide the mast and boom sections together.
- Take the sail and insert the sail battens.
- Slide the mast into the mast sleeve of the sail.
- Attach the supporting shrouds through the mast sleeve opening with the shroud shackle to the top mast section eye.
- Take the jib halyard through the jib ring at the top mast section eye, fasten carabiner at halyard loop above the shroud shackle (Orca 375 only).
- Place the mast in the mast step, through the deck collar.
- Attach the supporting shrouds to both sides of the tubes by leading the shroud through the tube D-ring and secure it in the shroud cleat. Make sure the mast stands straight with just a little shroud tension.
- Fasten jib tack with shackle at bow ring and fasten carabiner at jib head. Raise the jib, insert halyard through bow ring, insert through cleat and fasten tight (Orca 375 only).
- Attach the boom to the mast by snapping the front end of the boom to the mast.
- Attach both of the Velcro straps from the sail to the boom.
- Apply the downhaul and outhaul with the correct tension.
- Attach the mainsheet block with snap shackle to the bridle.
- Attach jib sheet at jib clew, insert sheet through jib rings on tubes and apply eight knot. The sheet can be secured in the seat clams diagonally during sailing (Orca 375).
WARNING
Make sure the sailing rig is properly inserted straight through the deck collar into the mast step to the bottom.
WARNING
Make sure the mast stands straight and is properly held down and supported by the shrouds attached to the mast and both sides of the tubes. The improper attachment of the supporting shrouds can lead to the loosening of the sailing rig which can cause the watercraft to get out of control and may cause injury to the crew.
3.8.4 Preparation before going into the water
- Attach the rudder to the transom. Ensure that the rudder is locked with the rudder retaining clip.
- Slide the daggerboard through the seat into the daggerboard case.
- Close the self-bailer.
☝︎ The daggerboard has to be inserted into the daggerboard case with the blunt profile aimed to the bow. A wet daggerboard makes it easier to slide into the casing. The provided elastic band, with the ends knotted together as a loop, can be put around the daggerboard and seat to hold the daggeboard into the required position.
☝︎ The bridle has to be attached over the tiller of the rudder.
WARNING
Attach the rudder with the retaining clip. Incorrect securing can lead to the loss of the rudder and consequent loss of direction of the watercraft, which can lead to life threatening situations.
WARNING
Always secure the tiller in the rudder head before sailing. The rudder can otherwise be damaged and lead to loss of direction of the watercraft which could result in life threatening situations.
3.8.5 Sailing
This manual does not provide sailing instructions and assumes that the operator and passengers have adequate sailing experience and qualifications. Your DinghyGo supplier or sailing club is able to inform you of training opportunities, such as sailing courses.
WARNING
Only sail once you and your crew have adequate sailing experience and can guarantee you know how to react to the (expected) conditions, safety hazards, the performance of individuals and the workings of the watercraft. Make sure the equipment of the crew and the watercraft is valid. Improper use, faulty equipment and unsuitable conditions can cause life threatening situations.
3.8.6 Disassembly
- Take the rudder off of the transom by pressing/releasing the rudder retaining clip.
- Remove the daggerboard from the daggerboard case and seat.
- Take down the jib by pulling the halyard from cleat, lower the jib and release jib head from halyard carabiner. Detach the carabiner from halyard loop, pull halyard from mast jib ring and bow tube ring (Orca 375).
- Disconnect the mainsheet block from the bridle by opening the snap shackle.
- Detach the supporting shrouds from both sides of the tube D-rings by releasing the shrouds from the shroud cleats.
- Raise the sailing rig out of the mast step straight through the deck collar.
- Release the outhaul and downhaul and detach the boom from the mast.
- Take the boom sections apart.
- Remove the battens from the sail, detach the supporting shrouds from the mast by releasing the shroud shackle and pull the mast sleeve off of the mast.
- Take the mast sections apart.
3.8.7 Removal of the mast step board and seat
- Partially deflate the floor and side tubes (read the paragraph on "deflation of the boat"), in such a way that it still has shape but is not pressurised.
- Detach the flexible portion of the daggerboard case from the underside of the seat.
- Slide the seat backward from its mounting tendons on the floats.
- Pull the mast step board out of the stoppers from the bow of the boat. Lifting the bow with one hand makes it easier to take out.
- Take out the oars from the oarlocks after turning them 180 degrees with the blade forward parallel with the tube and take apart the oars.
3.8.8 Packing up and storing the sail kit
- Ensure that all of the sail kit parts are clean and dry. Parts that have been subjected to (salt) sea water should be washed and cleaned immediately with fresh water after use.
- Lay out the sail kit bag on the ground with the opening facing towards you.
- Firstly, put the daggerboard and rudder in the sail kit bag and then stack the loose mast and boom sections on top of them.
- Add the loose oar components to the bag.
- Add the seat and mast step board to the bag.
- Add the folded sail, battens and rope set into the bag.
- Add the folded jib, jib rope set into the bag.
- Finally, add the hand pump.
- Shut the bag firmly with the straps and buckles.
- Carry the bag by the handles.
- Carry and store the bag in a sheltered, dry place under normal temperatures, free from heavy load, vermin, dangerous substances and radiation.
☝︎ When packing, the outhaul, downhaul and mainsheet ropes and blocks remain attached to the boom. The bridle remains attached to the transom eyes in the boat.
3.9 Installation of the oars
The DinghyGo boats are equipped with divisible oars, oarlocks and a combined rowing seat and daggerboard case.
- Make sure the seat is installed correctly (read the section “Installation of the mast step board, seat and bridle ").
- To install the oars in the oarlocks, hold the oars parallel to the tubes with the blade facing forwards (not backwards, they won’t go in) and insert the metal fastening pin into the oarlock as deep as possible.
- Then, turn the oars with the blades outward, so they are secured in the oarlock and can be used correctly.
- When the oars are not used they can be stored along the tubes, located by the oarlocks and the elasticated oar holders at the aft end of the side tubes.
☝︎ Take local conditions into account before treading the water with your DinghyGo, whether it’s with the sail kit, oars, or an outboard motor. It is possible that the propulsive power of the boat is not strong enough to sail against a strong tide or river flow.
CAUTION
Incorrect attachment of the oars can damage the attachment pins and oarlocks. Remove superfluous plastic from the bottom of the oar lock opening when necessary.
3.10 Installation of an outboard motor
☝︎ Consult the "Model specification table” in this guide to understand the maximum outboard motor power and weight.
☝︎ Using an outboard motor that exceeds the maximum horsepower or weight may have these results:
- Difficulties with manoeuvrability and / or the stability of the boat
- Changes from the designed flotation or sailing characteristics of the boat.
- Damage to the boat, in particular the areas around the transom.
☝︎ Use an emergency stop switch. This will stop the outboard motor if for any reason the operator of the boat has left the controls.
DANGER
Using an outboard motor with too much power or weight can result in serious injury, death or damage to the watercraft.
3.10.1 Mounting the outboard motor
- Make sure you are standing in a safe and stable position.
- Unlock the outboard motor so that it becomes possible to tilt the clamp, then mount the outboard motor onto the transom using the clamp screws.
- The outboard motor must be in the middle of the transom to be used properly. When lowering the outboard onto the transom, take care not to damage the rudder gudgeons.
- The clamp bracket should be screwed securely onto the motor plates on the transom. Check this periodically as on some motors the clamp screws can vibrate loose in use.
CAUTION
There might be outboard motors that are damaging to the rudder gudgeons when being attached to the transom. Make sure your outboard motor fits and if necessary, have it adjusted by an expert. You could also ask your DinghyGo supplier for help.
3.10.2 Position of the outboard motor
The outboard motor has to be installed in such a way that it stands vertically in the water when it is in the normal operating position.
This means that the "cavitation plate" at the bottom of the outboard motor is situated horizontally in the water when the boat is in its normal position. On most outboards there is a means to adjust the angle of the shaft relative to the clamp bracket, please consult your outboard supplier if you are unsure how to do this.
3.10.3 Starting the outboard motor
- Pull the boat into the water.
- Secure the outboard motor in the correct position with the clamp screws.
- Make sure you are standing securely and then start the outboard motor.
- Avoid high speeds when traveling in reverse with the boat. It is possible for water to enter the boat over the transom.
☝︎ Ensure that the self-bailer in the transom is closed before taking the boat into the water.
3.11 Deflation of the boat
☝︎ Make sure the boat is clean and dry before rolling it up for storage. Remove any sand and debris that may cling to the skin material.
☝︎ Do not let the boat deflate chamber by chamber. Deflate the chambers evenly; this will prevent damage to the bulkheads in the boat.
Deflation:
- Put the boat on the ground.
- Put your finger in the valve and turn to grey screw button to the right (for more information on valves, see "the valves").
- Let some air out of the hull tubes and floor.
- Make sure the inside of the valve shrouds open (to enable the air to get out during folding).
- Push evenly onto the whole boat to expel as much air as possible.
3.12 Packing up and storing the boat
- Put the boat on the ground.
- Remove all the sailing and rowing parts, including seat, mast step board and oars.
- Fold the side tubes toward the middle, so that the whole boat is same width as the transom.
- Fold the bow over the deck.
- Pull the bow and deck backwards towards the end of the daggerboard case.
- Fold the round-shaped aft ends of the tubes towards the middle of the transom.
- Lift and pull the transom forwards over the already folded portion.
- Place the compact folded package onto the spread out boat bag.
- Fold the two small, and then the two big bag pieces around the package and fasten them with the straps and buckles.
3.13 Transport
3.13.1 Getting the boat out of the water
Make sure that there are no sharp edges located at the point where you want to lift the boat out of the water.
Preferably use the lifting eyes or handles for lifting, and not the ropes.
3.13.2 Towing the boat
☝︎ If the inflatable boat has to be towed by another boat, it has to be empty:
- Remove the sailing rig, the outboard motor, fuel tank, batteries and other equipment.
- Close off the daggerboard case in the floor with the provided flexible insert (made of black EVA material), roll up the flexible part of the daggerboard case, and buckle up before closing.
☝︎ Important: The handle on the bow should not be used for towing, anchoring or mooring.
- Use the metal rings located on the port and starboard sides of the bow for towing. This allows the boat to remain stable behind the towing yacht, and it will also prevent damage to your boat.
- Attach a line between the towing rings to form a cross. Attach a towing line to this and tow the boat at low speed.
WARNING
- Never tow the watercraft with people on board.
- Check the towing line repeatedly.
- Periodically check the towing conditions and make sure no water enters the watercraft.
4. Recommendations for safety and use
4.1 Important safety instructions
☝︎ Emergency stop switch and lanyard
The purpose of the emergency stop switch lanyard is to turn off the outboard motor when the boat’s operator moves far enough away from the operator's position causing the switch to be activated. This is the case when the operator accidentally falls overboard or moves too far from the operator's seat in the boat. Falling overboard or accidentally being thrown from the seat are both scenarios that are likely to occur after improper use, for example, by sitting on the gunwale at planing speeds, standing up at planing speeds, operating at planing speeds in shallow water or in water with many obstacles, by releasing grip on a tiller that was pulling to one side, the use of alcohol or drugs, or by performing boat manoeuvres at daring high speeds.
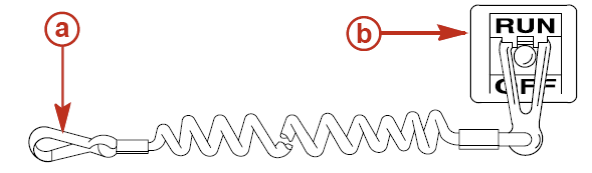
Drawing of the Emergency Stop Switch
Outboard motors with a tiller and some remote control units are equipped with an emergency stop switch.
The cord of the emergency stop switch lanyard is usually between 122 and 152 cm (4'-5 ') in length when stretched out. The first part should be placed at one end of the switch (see "Drawing of the Emergency Stop Switch", item b.) and a snap on (“Drawing of the Emergency Stop Switch", item a.) which has to be attached to the operator at the other end. The cord is a helical cord so that it is as short as possible when it is not drawn, and so that the likelihood of entanglement with nearby objects is as small as possible.
The length of the stretched-out cord is coordinated in such a way so that the risk of accidental activation is reduced to a minimum; in case the operator wants to move around the boat. If a shorter string is desired in a certain situation, the cord can be wrapped around the wrist or the leg of the operator, or the operator could tie a knot in the cord. Although the outboard motor is turned off immediately by activating the emergency stop switch, the boat will continue to sail or coast on depending on the speed and the sharpness of the curve at the time that the outboard motor was switched off. However, the boat will not make a complete circle. While the boat is coasting, the risk of serious injury to people in the path of the boat is as serious as when the outboard motor is running.
We strongly recommend that other passengers are instructed about the proper starting and operating procedures, should they be required to operate the outboard motor in an emergency (e.g. if the operator is accidentally thrown away from the operator’s seat).
WARNING
If the operator falls from the watercraft, please note that switching off the outboard motor immediately can reduce the probability of death or serious injury from being run over. Attach the two ends of the Emergency stop switch lanyard securely to the Emergency stop switch at one end and the operator at the other end.
☝︎ Accidental or unintended activation of the switch during normal operation may also occur. This may cause one or more of the following potentially hazardous situations:
- Passengers could be thrown forward due to unexpected stopping (or loss of forward motion); this is especially a problem for passengers in the front of the boat; they could be thrown ahead (or be ejected over the bow) and be injured by the gear case, hull or propeller.
- Loss of power and loss of directional control might occur when there are heavy seas, strong currents or high winds.
- Loss of steering control during docking.
WARNING
Avoid serious injury or death from strong deceleration forces resulting from accidental or unintended activation of the Emergency stop switch. The watercraft operator should never leave the operator’s station without firstly disconnecting the Emergency stop switch lanyard from his body.
4.2 Essential checklist before use
- Check the pressure in the air chambers.
- Remove any obstruction from the self-bailer in the transom.
- Close the self-bailer to the transom.
- Make sure that the mast step board, seat / daggerboard case and bridle are fitted properly.
- Make sure that the boat is properly rigged, and that the mast is positioned in the mast step and secured underneath the deck with the spring locking system.
- Make sure that the daggerboard is fitted in the daggerboard case with the blunt side aimed towards the bow.
- Make sure the rudder is locked in the transom and that the tiller is secured in the rudder head.
- Make sure that the bridle is secured to the transom eyes, that it goes over the tiller and is attached to the mainsheet block with the snap shackle.
- Make sure the supporting shrouds are securely attached with the shroud shackle to the mast top section eye and to the D-rings on both sides of the tube with the shroud cleats.
- Make sure the jib tack shackle is fastened to the bow tube D-ring and the halyard is securely attached with the halyard carabiner at the jib head on one end and through the jib ring above the shroud shackle and through the bow tube D-ring in the cleat on the other end (Orca 375 only).
- Make sure the outboard motor is mounted firmly onto the transom and the daggerboard case is closed off with the provided insert if you want to go speeding with an outboard motor or want to tow the boat.
- Make sure you know the contents of the fuel tank and know the speed of the boat.
- Check that the emergency stop switch for the outboard motor works correctly.
- Make sure that the boat is not overloaded. Be careful not to exceed the maximum number of passengers and the maximum load. Check the builder’s plate on the boat.
- Make sure there is an approved and appropriate life jacket on board for each person on board, and that they are easily accessible.
- Check for the presence of the oars attached to the boat in the event of a problem with the outboard motor or sailing rig.
- The user is aware of safe navigation, sailing, and operating procedures.
- There is a life buoy or buoyant cushion on board in case someone falls overboard.
- Distribute the weight of the passengers and load evenly and make sure that everybody is seated safely.
- Instruct at least one passenger in the basics of boat handling, sailing, starting and operating the outboard motor in case the operator becomes disabled or falls overboard.
- At your departure, tell someone where you are going and when you expect to return.
- Do not use alcohol or drugs. It is illegal to operate a boat while under the influence of alcohol or drugs.
- Make sure you are familiar with the weather, water and the area where you will be sailing; winds, tides, currents, sand bars, reefs, rocks, wrecks and other hazards should be taken into account.
WARNING
- The maximum propulsion for the watercraft (kW) is listed in the “model specifications” table of this manual.
- Do not use the watercraft with an outboard motor whose power is greater than indicated on the builder’s plate of the watercraft.
- Do not use the watercraft with negative trim settings of the outboard motor (bow down) at high speed. The watercraft can tilt and may become unstable when cornering. Use negative trim to accelerate to planing and to lower planning at lower speeds in choppy water (applicable to watercraft equipped with a power trim on the engine).
- Do not use the watercraft in high speeds on busy waterways or when visibility is restricted, in strong winds, or in high waves. Slow down as courtesy and for the safety of yourself and others. Observe and obey local speed and wake limits.
- Follow the sailing rules as stated by the COLREG.
- Always keep sufficient distance to be able to stop or swerve to avoid collisions.
WARNING
Bilge water should be kept to a minimum.
4.3 Stability and buoyancy
4.3.1 Placement of passengers and personal items
For safety, we recommend that the passengers are seated as close as possible to the middle of the boat. The location of the passengers has a direct impact on the stability and trim of the boat. You are able to sit on the side of the boat, provided that counterweight is provided on the other side, or if it is needed for sailing purposes. Ensure that loose equipment is fastened securely.
4.3.2 Sailing
The use of the sailing equipment (the sail kit) has an influence on the freedom of movement of the passengers and the stability of the watercraft. The operator must take place behind the seat on the floor, so that he can properly operate the rudder and mainsheet. At higher wind speeds it might become necessary for the operator to sit on the windward tube to counterbalance the boat and prevent overturning.
Passengers must sit behind or in front of the seat on the floor, so that it does not interfere with the operation of the sailing boat and does not endanger personal safety.
The passengers have a shared responsibility of maintaining the stability of the sail boat such as helping to prevent overturning by adapting their seating positions and to anticipate their active roles on the sail boat.
WARNING
Misuse of the sailing rig, sudden changes in sailing behavior or hazardous conditions can lead to unexpected movement of the sailing rig, allowing parts of the rig (the boom in particular) to cause head injury or fatal injury.
4.3.3 Rowing
The position of the oars ensures a comfortable rowing position. Use the included rowing seat / daggerboard case to utilize the rowing possibilities.
WARNING
Up to one adult with a maximum weight of 75 kg or two children of 37,5 kg can be seated on the combined rowing seat and daggerboard case. More weight than specified, or standing or jumping on the seating can cause damage to the seat and watercraft and can thereby cause (serious) injury.
4.3.4 Outboard motor
The bottom of DinghyGo is designed in a "V" shape. This improves the sailing characteristics (in particular when sailing close to the wind), and the use of the outboard motor.
It is therefore also possible to plane over the water with your DinghyGo.
CAUTION
When traveling at high speeds or when (aqua)planing avoid abrupt corners and high waves; This can endanger the passengers. Make sure that everybody is holding on to the safety ropes. For comfort and safety, reduce your speed in high waves. Small children must sit inside of the watercraft. A breaking wave is a serious hazard to the stability of the watercraft. Always wear a life jacket!
☝︎ Jumping over waves and wakes:
When sailing with a leisure watercraft it is inevitable that you will encounter waves and wakes. However, when this is done with such high speeds that it forces the boat to be partially or completely pushed out of the water, certain hazards arise, particularly at the moment when the boat re-enters the water.
☝︎ The biggest concern is that the boat changes direction during the jump. In that case the landing may cause the boat to go in a new direction. A sharp change in direction can cause passengers to be thrown from the boat or from their places.
☝︎ There is another, less common dangerous situation that may result from allowing the boat to rise upwards from a wave or wake. If the bow of the boat comes up far enough in the air, it could come under the water surface and be submerged under the water when it hits the water. This will bring the boat to a halt immediately and might throw the passengers forward. The boat may also sharply steer away to one side.
☝︎ If speed is increased the bow will often make an upward movement. This may temporarily obstruct the view of the operator. If the speed of the boat is further increased, the boat will lie horizontally again. If you encounter strong wind while motoring, and the bow is angled upwards, the wind may blow the boat further up (and in extreme cases over).
WARNING
Avoid serious or deadly injury as a result of falling over into the watercraft when it lands after jumping a wave or wake. Avoid jumping over waves and wakes as much as possible. Instruct all passengers to duck and hold onto the watercraft handles when the watercraft is jumping a wave or wake.
☝︎ A single operator
If you are using the boat without passengers, do not sit on the side tubes. Your weight must be located towards the front and the middle as far as possible.
☝︎ Avoid heavy loading near the transom. Fast acceleration should be avoided to prevent the operator from being thrown backwards.
☝︎ Wind and wave conditions can be highly dangerous for your DinghyGo. You might be flipped over if the load is not distributed evenly, particularly if there is too little weight in the bow of the boat and wind and tide are working against the boat. Sailing with too much wind might lead to uncontrollability and damage.
☝︎ A good distribution of load and weight will take the bow down and create a safe situation.
☝︎ The anti-cavitation plate on the engine should be about 20 mm below the bottom of the transom.
- If your outboard motor is set too high on the transom, you will experience a lot of cavitation (air bubbles and slippage around the propeller).
- If your outboard motor is set too low on the transom it will create resistance / drag and water will enter the boat.
In both cases you will lose speed. Try to find the ideal position before attaching the outboard motor to the transom (consult your DinghyGo supplier or outboard motor supplier).
☝︎ We recommend that you keep the boat horizontal at all speeds. Make sure the bow is not pointing up or down (to the water).
Use the weight of the passengers in order to ensure that the boat lies horizontal.
Adjust the angle of your outboard motor:
- An outboard motor tilted too far from the transom will cause the bow to point up, which is very dangerous and inefficient.
- An outboard motor tilted too close to the transom will drive the bow section too deep into the water, causing a loss of speed and / or cavitation.
- The outboard motor clamp screws should be checked occasionally. Loose clamp screws will cause erratic manoeuvrability and possible loss of the outboard motor.
- Study the manual of the outboard motor carefully before operating the boat.
☝︎ Turning corners
Reduce speed when making a sharp turn. The boat will tilt considerably towards the centre of the rotation.
4.4 Danger, risks and hazards
☝︎ Dangers in the water
- Wrecks, reefs, rocks, sand banks and shallow water should be avoided or approached very cautiously.
- If you are not familiar with the area, obtain information about local risks before using the boat.
- Be cautious of offshore winds and currents.
☝︎ Faulty air chambers and broken floats
Your DinghyGo has been designed to work with more than one air chamber. Therefore, the boat always retains at least 50% of the buoyancy, even if a leak occurs in one of the air chambers resulting from a puncture. In that case, shift the weight to the other side. Secure the leaking chamber if necessary (by tying it down or by holding it up) and immediately proceed to the nearest shore or mother ship, depending on which is closest. However, be careful about shallow water or reefs, because they can further damage the boat.
☝︎ Beach landing
It is not recommended to sail onto the beach or to tow the boat over rocks, sand, gravel or pavement with the outboard motor running or with the complete sailing equipment operational. The boat and sail kit components such as the daggerboard and rudder could be damaged.
☝︎ Davits
If the boat is suspended in davits, you must open the self-bailer so that the boat cannot fill up with water and become too heavy. Please ensure that blockages do not occur.
☝︎ Sunlight
Make sure the boat is not exposed to the sun for too long. The changing air pressure inside the floats and floor might cause damage to the boat.
Longer periods of extreme sunlight (ultraviolet radiation) can accelerate the ageing process of the materials.
If the boat will be removed from the water for a long period of time, cover the boat to avoid exposure to direct sunlight. Your DinghyGo provider could provide you with an optional boat cover.
☝︎ Smoking
Do not smoke, especially when refueling.
☝︎ Fuel tank
Place portable tanks on a soft surface and securely attach them to the boat with a strap to avoid shocks and to avoid breakage or loss during sailing.
When refueling, always abide by the following recommendations:
Remove portable tanks from the boat when refueling them.
Fill the tanks out in the open air, away from heat, sparks or open flames.
Do not fill the tanks completely (up to the brim): the fuel will expand when the temperature rises and the tank might overflow or even rupture.
☝︎ Use in high altitude areas
The normal tube/floor pressure is 0.25/0.70 bar. If the boat is inflated at sea level (low height) and is transported – whilst still inflated – above sea level (higher altitudes) e.g. for use in a mountain lake, the pressure must be reduced in order to avoid the pressure from getting too high. A properly functioning tube relief valve will regulate this by itself.
☝︎ Swimming
DANGER
Turn off your outboard motor and stop the propeller when people are swimming close to your watercraft. The propeller can be very dangerous to people or objects in the water. Turn the outboard motor off immediately if you spot swimmers in the vicinity of your watercraft.
5. Maintenance
5.1 General Maintenance
Cleaning products / detergents
Use household cleaning products sparingly and never discharge cleaning products into waterways. Never mix different types of cleaning products and make sure you have plenty of ventilation in enclosed areas. Never use strong detergents, solvents or products containing phosphates, chlorine, solvents, non-biodegradable products or petroleum based products. Citric acid based cleaners are excellent for marine cleaning and safe for you and the environment. Your DinghyGo is cleaned best with fresh water and a normal household detergent.
☝︎ Detergents and cleaning products that contain alcohol or hydrocarbons should not be used on the fabric of the boat. These products will prematurely dry out or cause damage to the boat.
WARNING
Avoid serious / deadly injuries from fire, explosions or poisoning. The adhesives and solvents which are used for the repair of the inflatable parts are toxic and highly flammable. As a precaution, it is important that you always work outdoors or in a well ventilated area and away from any open flame, spark or appliances with pilot burners. Inhalation of vapors and exposure to the skin can be dangerous to your health. Avoid breathing in the vapors and contact with the skin and eyes by wearing a carbon filter respirator and protective gear over all exposed parts of the body.
5.2 Repairs
5.2.1 Small repairs
We strongly encourage you to contact your DinghyGo supplier if your boat is damaged.
If the damage consists of a small hole, you can use the repair material from the repair kit.
For any larger damage or in cases where the patches should be applied over a seam, a professional repair technician must repair the damage. Contact your DinghyGo supplier for the nearest address for repairs.
The best results when gluing are achieved when the relative humidity is less than 60%, the ambient temperature is between 18 ° C and 25 ° C (65 ° F-77 ° F) and there is no direct sunlight.
General procedure:
- Cut out a patch that is large enough to overlap the damage on all sides by 30 mm.
- Place the overlapping patch over the damaged area and trace the outline of the sticker with a pencil.
- Smooth out the marked area with sandpaper (not so much that the threads of the material become visible).
- Clean the patch and the area around the hole with a solvent (e.g. MEK).
- Using a short bristle brush, apply two thin layers of adhesive (glue) in circles to the back of the patch and to the area of the boat where the patch will be placed. Let the first coat dry completely (about 15 minutes) before applying the second coat. The second layer should dry until it feels slightly sticky and then apply the patch by pressing it down firmly. Use a smooth object (the back of a spoon works well) to remove any remaining air bubbles under the patch, working from the centre to the outside.
- Wait 24 hours before re-inflating the boat.
5.2.2 Leakage in tubes or floor due to tearing
I. Air leak resulting from an L-shaped tear
- Assess the size of the tear with your fingers and estimate whether you can use a small brush inside of the tear. If you cannot poke your fingers inside of the tear, make the tear bigger with a knife so that you have enough space. Prepare a patch of reinforced PVC material of 0.7 mm thickness (from the repair kit) and make sure it is large enough to completely cover the tear.
- Clean one side of the patch and the inside of the tear with a solvent (e.g. MEK). Then apply adhesive (glue) to the cleaned areas.
- Wait 15-20 minutes and check if the first layer of glue is dry. Apply a second layer of glue on the same places and wait another 15-20 minutes until the glue dries.
- Insert the patch into the tear and put it underneath the tear. Gently press the corresponding top part and apply pressure with a firm pressure tool, if the patch is in the correct place, in order to obtain a strong adhesion.
- Deflate the air chamber to 70-80% of the recommended air pressure and apply soapy water to the sealed area to detect air leaks.
- If there is no leak, dry the areas completely. You will now proceed to apply a patch on the outside of the tear.
- Prepare a patch of the same size of PVC material (0.9 mm, included in the repair kit) and repeat the process as listed above.
CAUTION
A repaired air chamber must be left to dry for at least 24 hours with an air pressure that is less than 80% of the recommended air pressure. Full inflation that occurs too early after reparation may result in poor adhesion of the patches.
II. Air leak caused by a straight cut or a small hole
- Assess the size of the tear with your fingers and estimate whether you can use a small brush inside of the hole. If you cannot poke your fingers inside of the hole, make the tear bigger with a knife so that you have enough space. Then create a patch of reinforced PVC material (0.7 mm thick) which is slightly longer than the hole and has a width of approximately 20-30 mm, so that the cut can be covered completely.
- Follow procedure as described above. Inflate the chamber at less than 80% of the recommended air pressure and leave it to dry for 24 hours in a dry place.
Consult your local DinghyGo supplier when concerned with any problems.
5.3 (Winter) Storage
☝︎ In order to prevent discoloration of the hull or air chambers as a result of accretion or contaminated water, prevent the boat from lying in the water for a long time.
- After sailing, the boat and all the components of the boat should be washed with a soft soap and then rinsed off with fresh water. Dry all parts before storage in the carrying bag. This prevents mould.
- Components with a wooden core (e.g. transom, deck, seat and mast step board) should be inspected for damage to the coating. Scratches, gouges and other damage that could put the underlying woodwork in contact with the water need to be updated and sealed with PVC or polyester.
- To keep the boat looking new store it in a cool, dry place and make sure that it is not exposed to direct sunlight for too long.
- A boat cover is available as an accessory to cover your boat during storage for protection.
- If you plan on storing your boat for a long time you have to take it out from the included bag. The boat is folded too tightly in the bag, which causes sharp folds in the material.
- Instead of the storing it in the bag, roll or fold the boat loosely and store it in a dry environment for long-term storage.
- Do not place heavy objects on the boat to prevent damage during storage.
- Avoid the presence of rodents, insects and other pests that cause damage.
6. The environment
Comply with environmental laws, procedures and responsibilities.
6.1 Disposal of polluting substances
Ensure that no contaminants enter the water around the boat. Please note that using the water for water sports gives you a responsibility to ensure a clean environment.
6.2 Removal and disposal of waste
“Waste” is the collective term for all types of aquatic garbage, disposal of plastics, packaging, food, wood, detergents, sewerage and even pieces of fish - in short, nearly everything. We recommend that you make sure you bring all of your waste back to land and dispose of it responsibly. In many areas the discharge of wastewater into waterways is strictly prohibited, even the use of a waste water outlet might be prohibited.
6.3 Recommended speed limits
Be careful when operating at high speeds, as they may:
- Endanger yourself and others, or people and objects that are in the water;
- Cause considerable waves behind the boat, which can cause damage;
- Cause unnecessary noise to fellow boaters.
6.4 Noise pollution
“Noise” can mean the sound of the outboard motor but also the voices of people. In many waterways, a noise limit is enforced. Music and loud conversations can be heard much farther on water than on land, particularly at night. Avoid noise pollution.
6.5 Exhaust emissions
Increased exhaust emissions (hydrocarbons) cause the pollution of water and air. Keep your outboard motor tuned and keep the hull of the boat clean for optimum performance. Refer to the outboard motor manual for information or contact your DinghyGo supplier.
Appendix Instruction Videos
| No. | Video | Duration |
|---|---|---|
| 1 | Unpacking bags | 0:49 min |
| 2 | Inflating | 1:39 min |
| 3 | Assembling | 2:42 min |
| 4 | Installing | 1:32 min |
| 5a | Rigging | 2:42 min |
| 5b | Rigging jib | 2:16 min |
| 5c | Apply reef | 0:48 min |
| 6a | Preparing for launch | 0:43 min |
| 6b | Daggerboard case seal (optional) | 0:46 min |
| 7a | Rigging down | 2:21 min |
| 7b | Taking down jib | 1:22 min |
| 8 | De-installing and deflating | 1:17 min |
| 9 | Packing up boat | 2:35 min |
| 10 | Packing up sail-kit | 1:36 min |
Appendix Warranty
These warranty clauses are part of the Aquacrafts B.V. General Terms and Conditions.
16. Article WARRANTY
16.1. The Supplier guarantees that the delivered Product has properties which are needed for normal use, free from defects, taking all circumstances into account.
16.2. Taking the guarantees listed above in account, the Supplier guarantees the absence of structural defects that arise after delivery of the Product to Customers for a period of 12 months. For deliveries to Customers in EU countries the Supplier guarantees an additional period of 12 months.
16.3. The guarantee is valid after registration of the contact and address data of the Customer by the Supplier or its representative, along with the serial number (Watercraft Identification Number) of the delivered Product.
16.4. The Customer is entitled to the free repair of structural defects of the Product by the Supplier within the applicable warranty period. The warranty covers tears, porosity, rot and delamination of the material and releasing seams. Any transport costs are borne by the Customer.
16.5. The Customer is entitled to the free repair of structural defects and is entitled to the replacement of related components of the Product, including, but not limited to the sailing rig, seating, mast step board, daggerboard, rudder, hand pump and bags, this is valid within the first 12 months of the valid warranty period. Any transport costs are borne by the Customer.
16.6. The following Products are not covered by the warranty of the Supplier: outboard motors, generators, batteries, automatic inflation systems, climate systems, transom wheels and all other parts and accessories not manufactured or supplied by the Supplier.
16.7. The Supplier is not liable for defects arising from the nature and quality of materials used, but which do not affect the use of the Product, including but not limited to cosmetic discoloration and damage to the material surfaces such as tears, scratches, moisture blowing bubbles, bumps, potholes, other deformations, corrosion, fading, becoming dull, weather, fungus (mould), growth of underwater organisms, texture changes and the letting go of edges.
16.8. The Supplier is not responsible for defects (after delivery of the Product) that are caused by:
- Normal wear and tear, improper handling or ignoring user instructions, conditions and warnings listed in the user manual and instructional media.
- Misuse, abuse, negligence, including but not limited to improper mooring, trails, boating, too much pressure and too little pressure of the air chambers and causing holes, gaps, tears and excessive wear.
- Inaccurate, inadequate and overdue maintenance and the use of improper cleaning and maintenance products for the inflatable parts, including and not limited to strong solvents, thinners and silicone-containing agents.
- Use of an outboard motor, sail rig, rowing installation or other propulsion systems that have a higher power or weight than specified on the builder’s plate or do not meet other requirements.
- Excessive load, including and not limited to the number of passengers and loading weight higher than specified on the builder’s plate.
- Incorrect (de-) installation of the outboard motor, sailing and rowing (rig) equipment.
- Improper use of trailers, davits, garage or other methods of storage and transport facilities.
- Participating in or preparing for racing or other racing and competitive sports, the rental and lending of the watercraft and other commercial activities.
- Damage, wear, corrosion and rot caused by abnormal environmental conditions, including but not limited to water and air pollution, osmosis, fuels, acids, salts, resins, chemicals, electricity, radiation, combustion, rain, hail, storm and lightning.
- Loss, theft, collision, pests and accidents.
- Damage caused by force majeure, including but not limited to extreme hydro, wind or weather conditions.
- Changes to the Product made by third parties or by the Customer, or removing parts, or adding components or accessories not manufactured, supplied or approved by the Supplier.
16.9. Nor is the Supplier liable for any damage resulting from costs made by taking the watercraft out of the water, launching the watercraft, towing, mooring, cleaning, maintenance, storage, loading and unloading, transportation, travel, waiting, insurance, rent, research, insurance, communication, mediation, emergency or loss of income and time, and all other types of incidental or consequential damages.
17. Article WARRANTY CLAIMS
17.1. Warranty claims must be made within the applicable warranty period as quickly as possible and no later than 7 days after the event of a possible defect of the Product by the Customer, reported through Distance communication techniques to the Supplier or its representative.
17.2. A warranty claim for a Product contains the contact details, including place of residence or address and email address of the Customer, the Watercraft Identification Number, a clear definition of the problem(s) including detailed photographs and / or videos of the defect and any suspected circumstances surrounding the problem and its cause.
17.3. The Supplier will assess the warranty claim as soon as possible and reply no later than 7 days via Distance communication techniques. When remote evaluation is not possible, the Customer will request the Supplier to have the Product inspected by the designated representative of the Supplier to offer any repairs if necessary.
17.4. Using the Product after discovery of a defect is the responsibility and risk of the Customer.
17.5. After assessment of the warranty claim, the Customer might ask the Supplier for permission to continue to use a Product with minor flaws temporarily, until the Customer is able to show the representative of the Supplier the watercraft for additional assessments, or repairs.
17.6. If possible, the Customer may request the Supplier or its representative to provide the necessary transportation for warranty inspection and / or repairs at the expense of the Customer.
17.7. The consequences of late complaints shall be at the risk and expense of the Customer.
Appendix Rudder assembly (after unboxing)
Rudder assembly instructions
a. Slide the rudder head (10) on the rudder blade (1).
b. Place the bolt (14) in the bolt retainer (2).
c. Insert the bolt (14) in the rudder head (10) through the rudder blade (1) and head holes. Make sure the bolt retainer (2) locks into the 2 smaller rudder head holes.
d. Screw the wing nut (15) on the bolt (14).
e. Put the bolt cap (13) on the bolt end for protection.
f. Insert the tiller (4) through the tiller holders (3 and 6) by pressing and releasing the tiller spring lock (5).
Appendix Orca rig boom assembly (after unboxing)
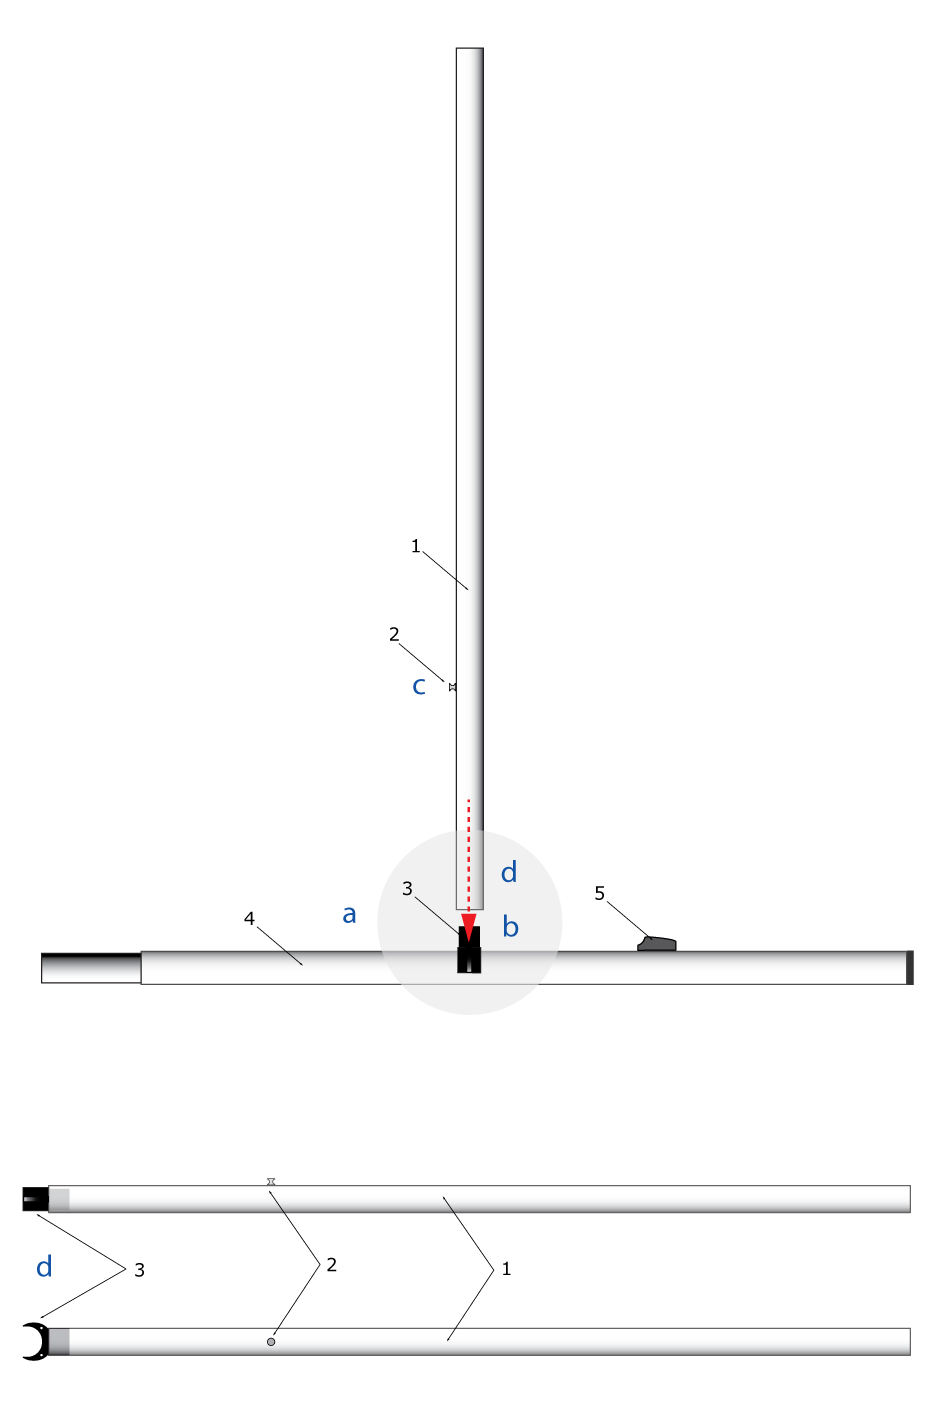 Sideway boom view
Top boom view
Sideway boom view
Top boom view
Legenda
| No. | Item | No. | Item |
|---|---|---|---|
| 1 | Boom part 1 | 3 | Inboard end |
| 2 | Pin stop | 4 | Mast part 1 |
Orca sailing rig boom end assembly instructions
a. Put mast part 1 (4) on the floor.
b. Snap the unmounted inboard end (3) onto the mast (4).
c. Take boom part 1 (1) and position the front side (closest to the pin stop (2)) on the inboard end (3). Make sure the pin stop (2) points upward, parallel with the mast part (4).
d. Push boom part 1 (1) firmly downwards until the tubular section of the inboard end (3) is fully inserted into the boom.
Appendix Declaration of conformity
Example Declaration of Conformity — DinghyGo Orca 375 V1.1